Azure Storage Mover: How to migrate files from AWS S3 to Azure
Learn how to migrate files from AWS S3 to Azure using Azure Storage Mover. Step-by-step guide for secure, scalable cloud-to-cloud migrations.

Moving files between environments can be a headache. Whether it’s from on-premises to Azure, or from AWS to Azure, there’s always the same challenge: how do you do it securely, at scale, and without reinventing the wheel? Traditionally, you might reach for tools like AzCopy, Azure Data Box, or Azure Migrate, but there’s a new option designed to make migrations smoother: Azure Storage Mover.
In this post, I’ll walk you through what Azure Storage Mover is, highlight its new cloud-to-cloud migration capability for moving data from Amazon S3 to Azure Blob Storage, and show you how to get started.
What is Azure Storage Mover?
Azure Storage Mover became generally available in February 2022, it was launched as a fully managed hybrid migration service that made moving your files and folders to Azure easy.
Azure Storage Mover can scale to meet the size of the migration you are trying to run, and jobs can be run as one offs or they can be run multiple times meaning you can sync deltas of any changes.
Earlier in 2025, a new feature was added to Azure Storage Mover, cloud-to-cloud migration. This allows you to securely transfer data from Amazon Simple Storage Service (Amazon S3) to Azure Blob Storage.
This feature is still in public preview, so is subject to change and there are some limitations to the product at the moment:
- Private networking is not currently supported. The cloud-to-cloud feature securely transfers data by limiting S3 access to trusted Azure IP ranges, thus ensuring a controlled move of data over the public internet.
- Each job supports the transfer of up to 10million objects.
- A maximum of 10 migration jobs can happen at one time within a subscription.
- If the data is stored within AWS Glacier or Deep Archive you must rehydrate it before you start the migration.
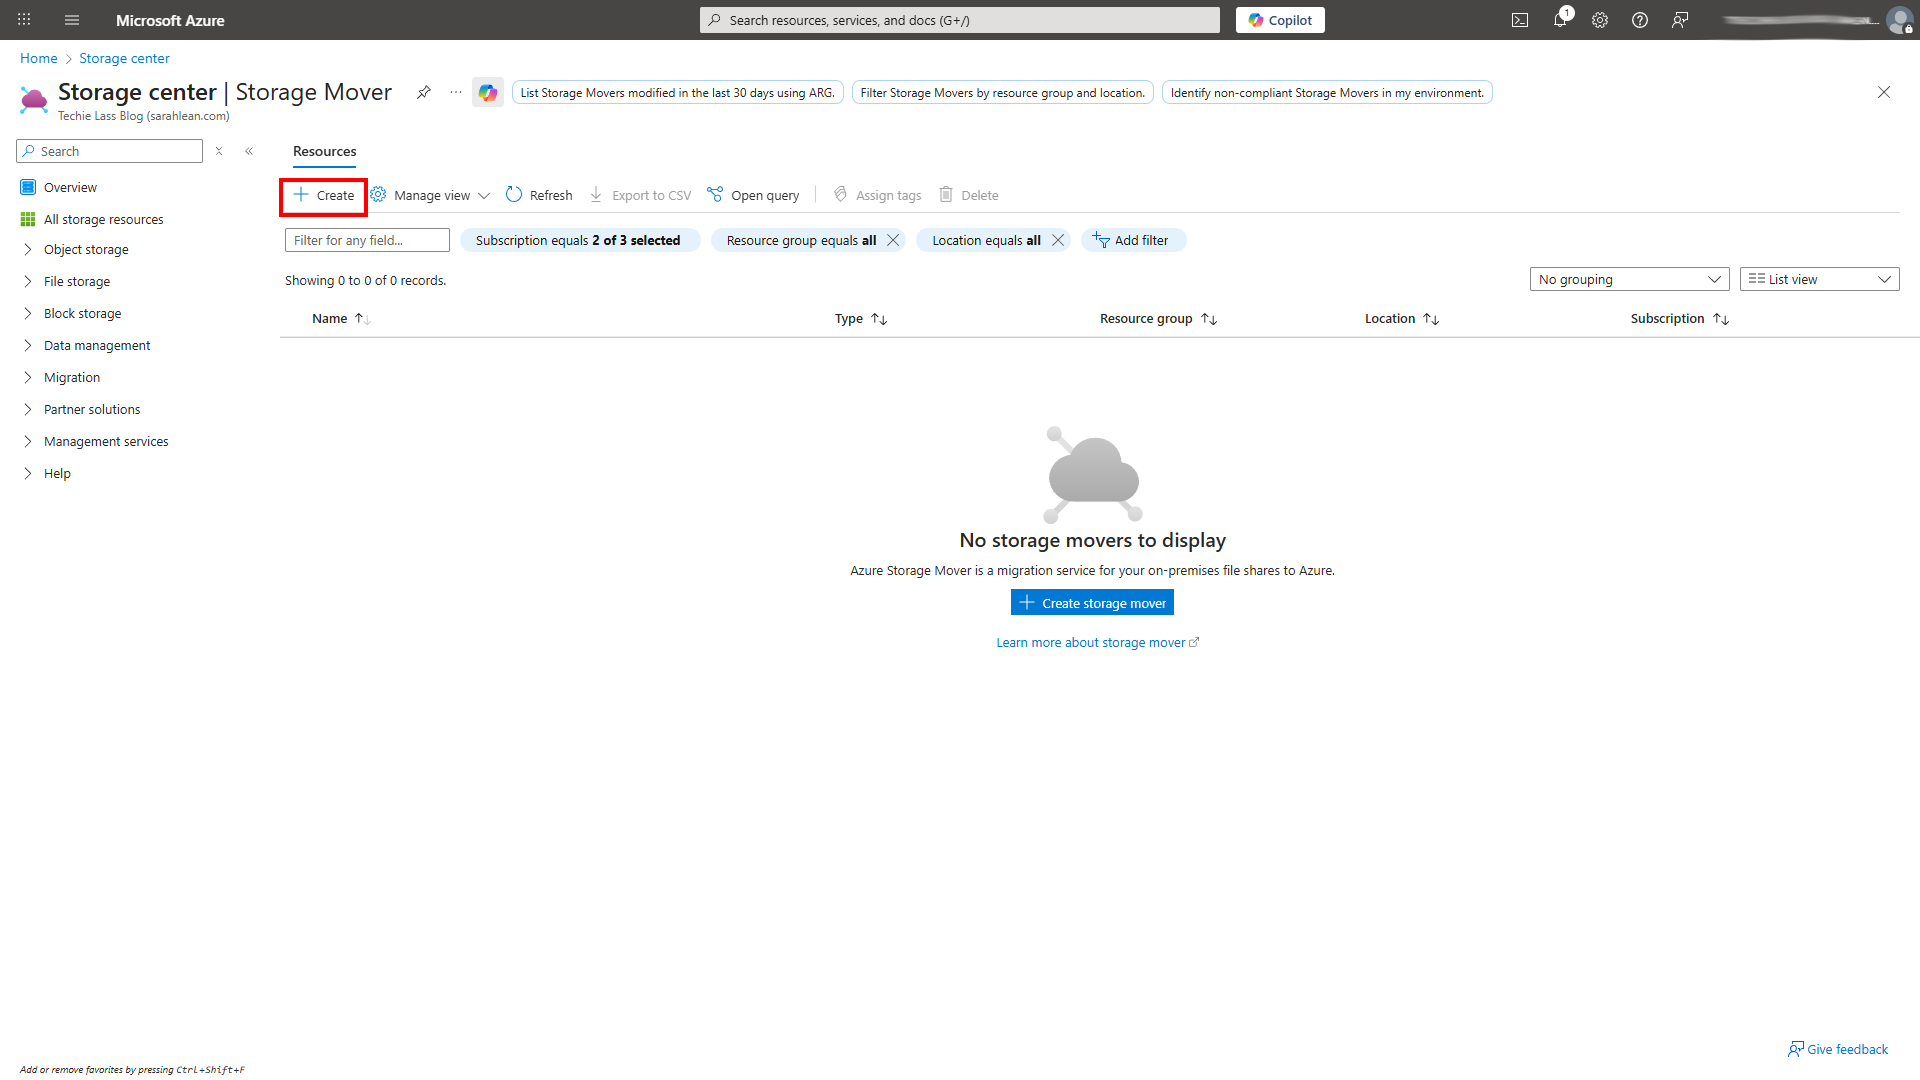
Create Azure Storage Mover resource
The first step you need to do to migrate data from AWS is create an Azure Storage Mover resource.
Go to the Azure Portal and in the top search bar search for Storage Movers.

Click on Create and you will be presented with the wizard asking for information about subscription, resource group, name and region for setting up the service. Fill in the relevant information and click on Next.
The next question set in the wizard is about monitoring, I’d recommend setting up logs that are sent to a Log Analytics workspace so you have logs to troubleshoot if things don’t go to plan.
The next screens within the wizard are about Azure Tags and confirming you are happy with the choices you have made. Click on Review + Create when you are happy to create the resource.
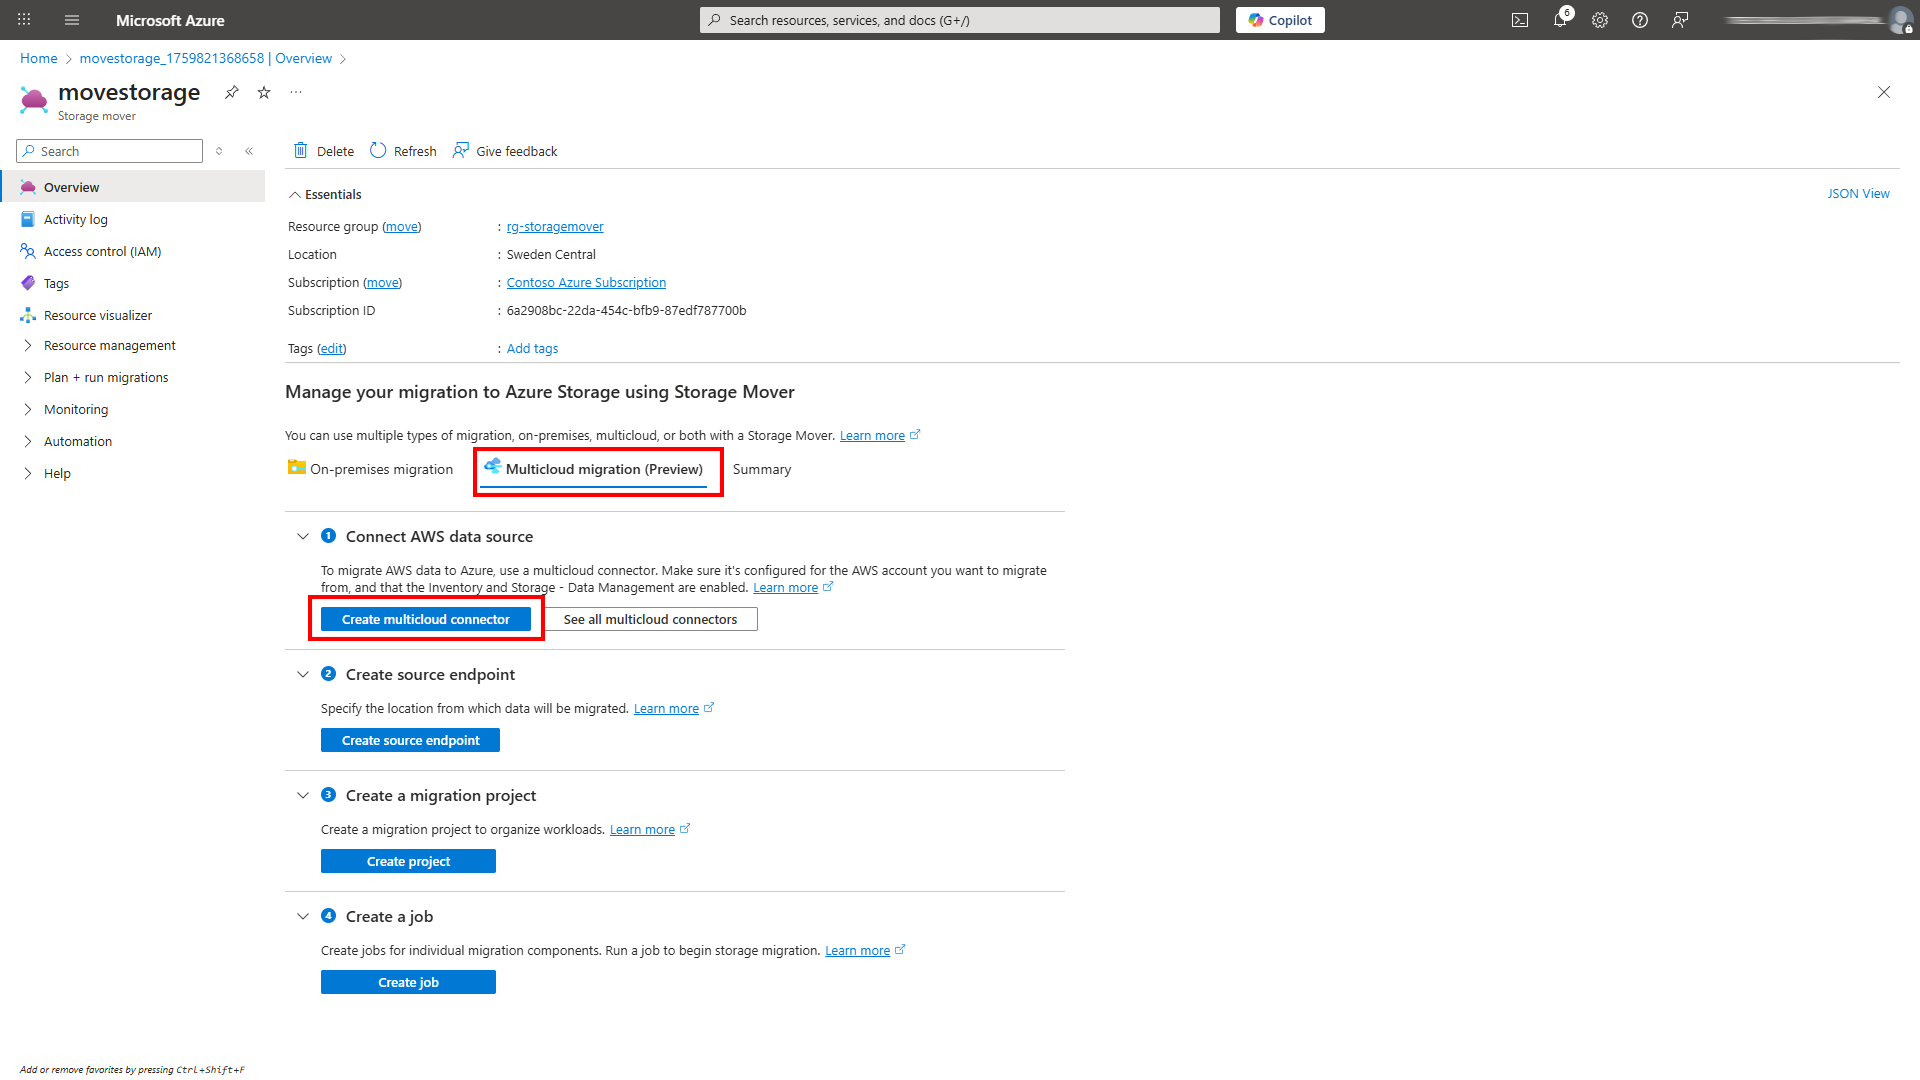
Create a multicloud connector for AWS
The next step is to connect a multicloud connector that allows you to securely connect AWS to Azure.
Navigate within the Storage Mover resource you just created and click on Overview then select the Multicloud migration tab.
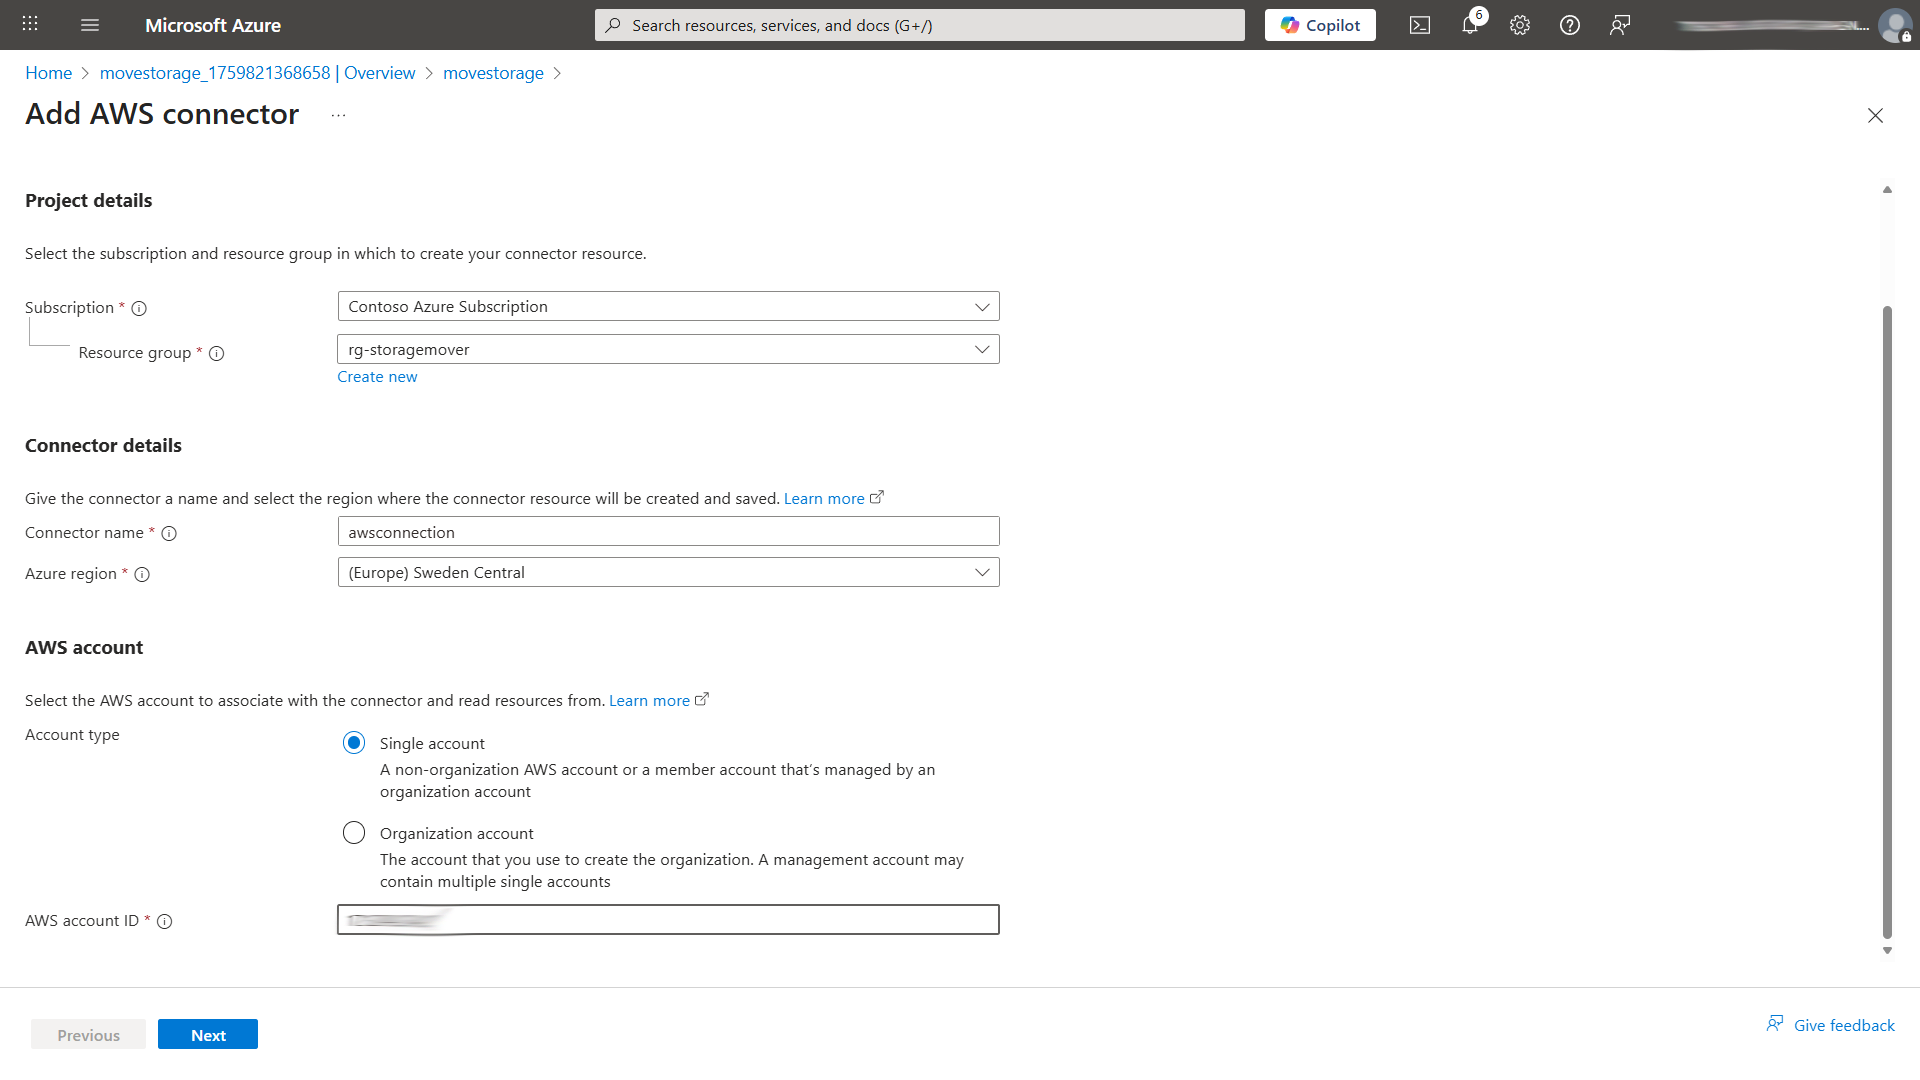
Within the Multicloud migration tab, click on Create multicloud connector to open the Add AWS connector page.
Within this wizard you will be asked for information around resource group, subscription, the name of the connector, the Azure region and then which AWS account to associate the connector with and read resources from.
You have the option to pick a single account or use an organization account. For this example I am selecting a single account.
Within the next screen you are asked which solutions you’d like to use with this connector. You have the option of Inventory, Arc onboarding and Storage - data management. For this example we’re going to add Inventory and Storage - data management.
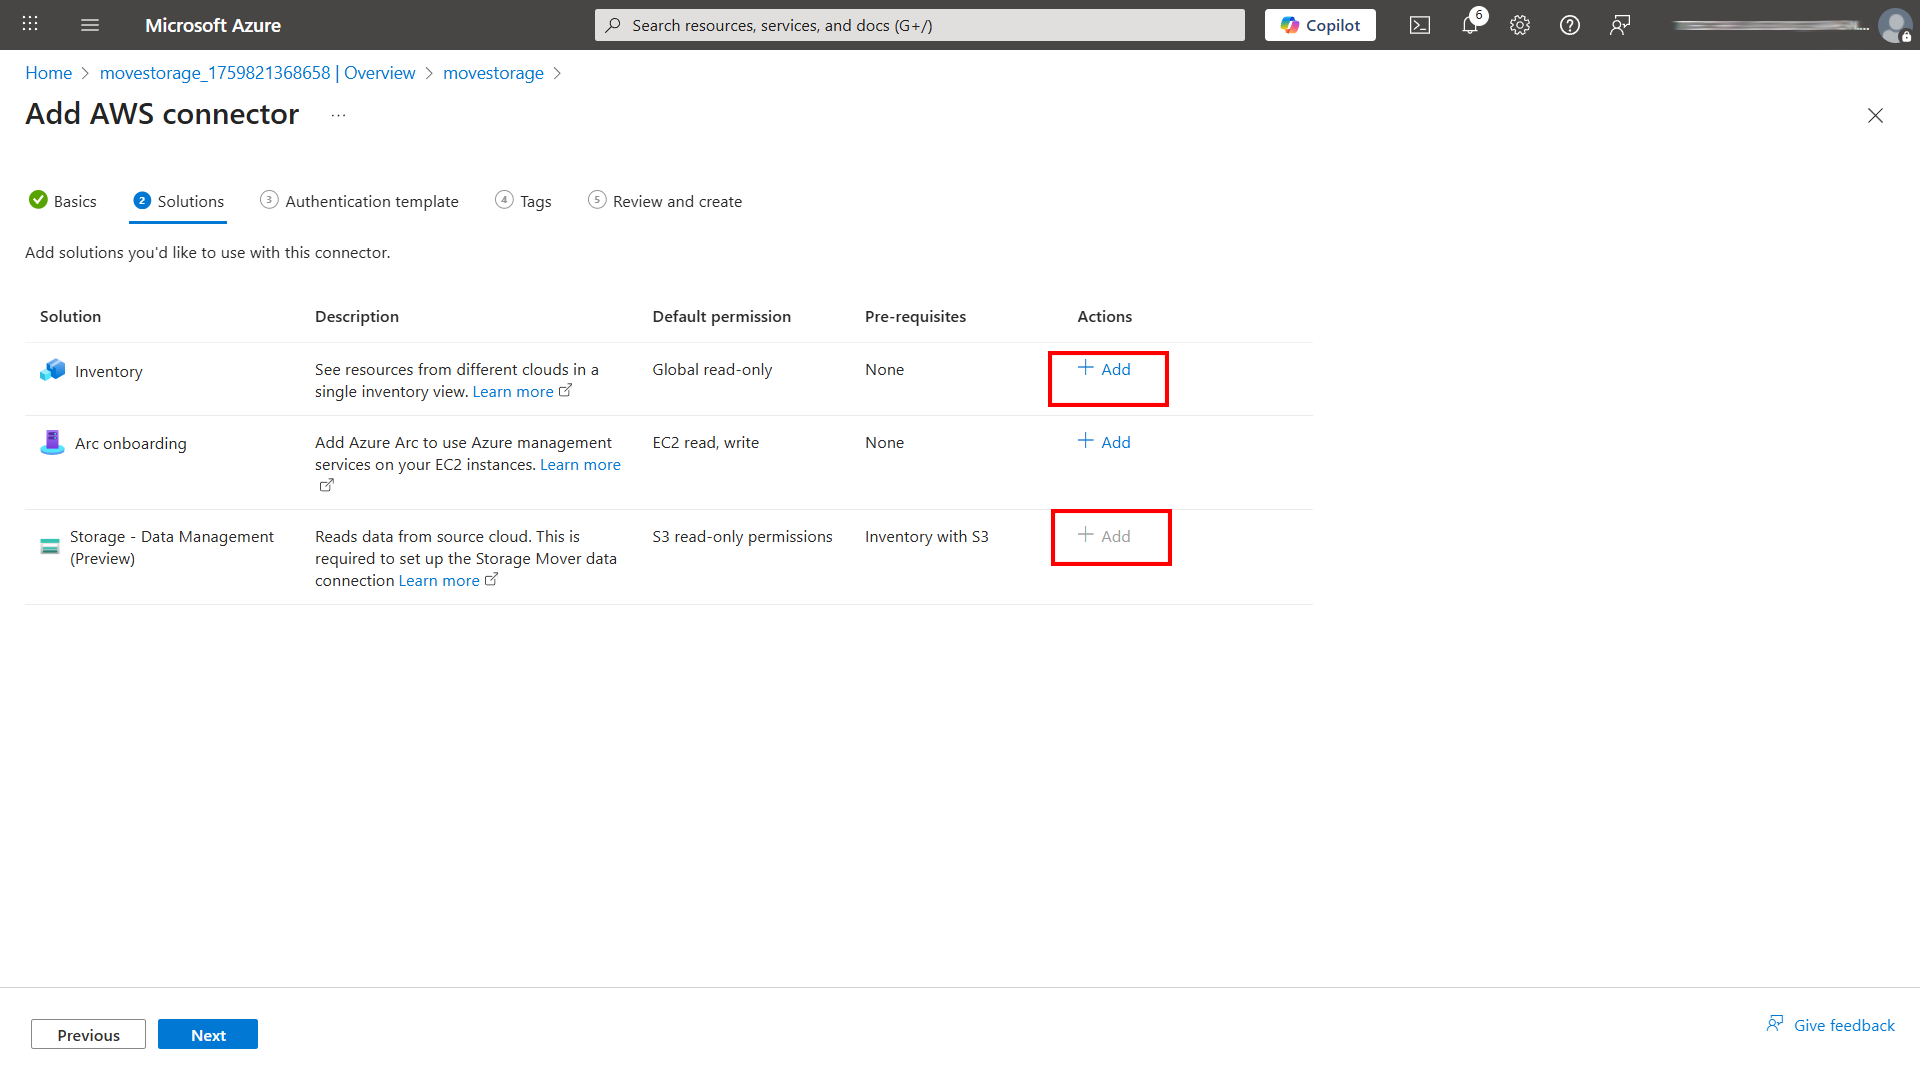
When you add the inventory solution you will be asked questions like which AWS services you wish to discover, which permissions you wish the connector to have, how often to want the scan to occur and which regions you want included in the scan.
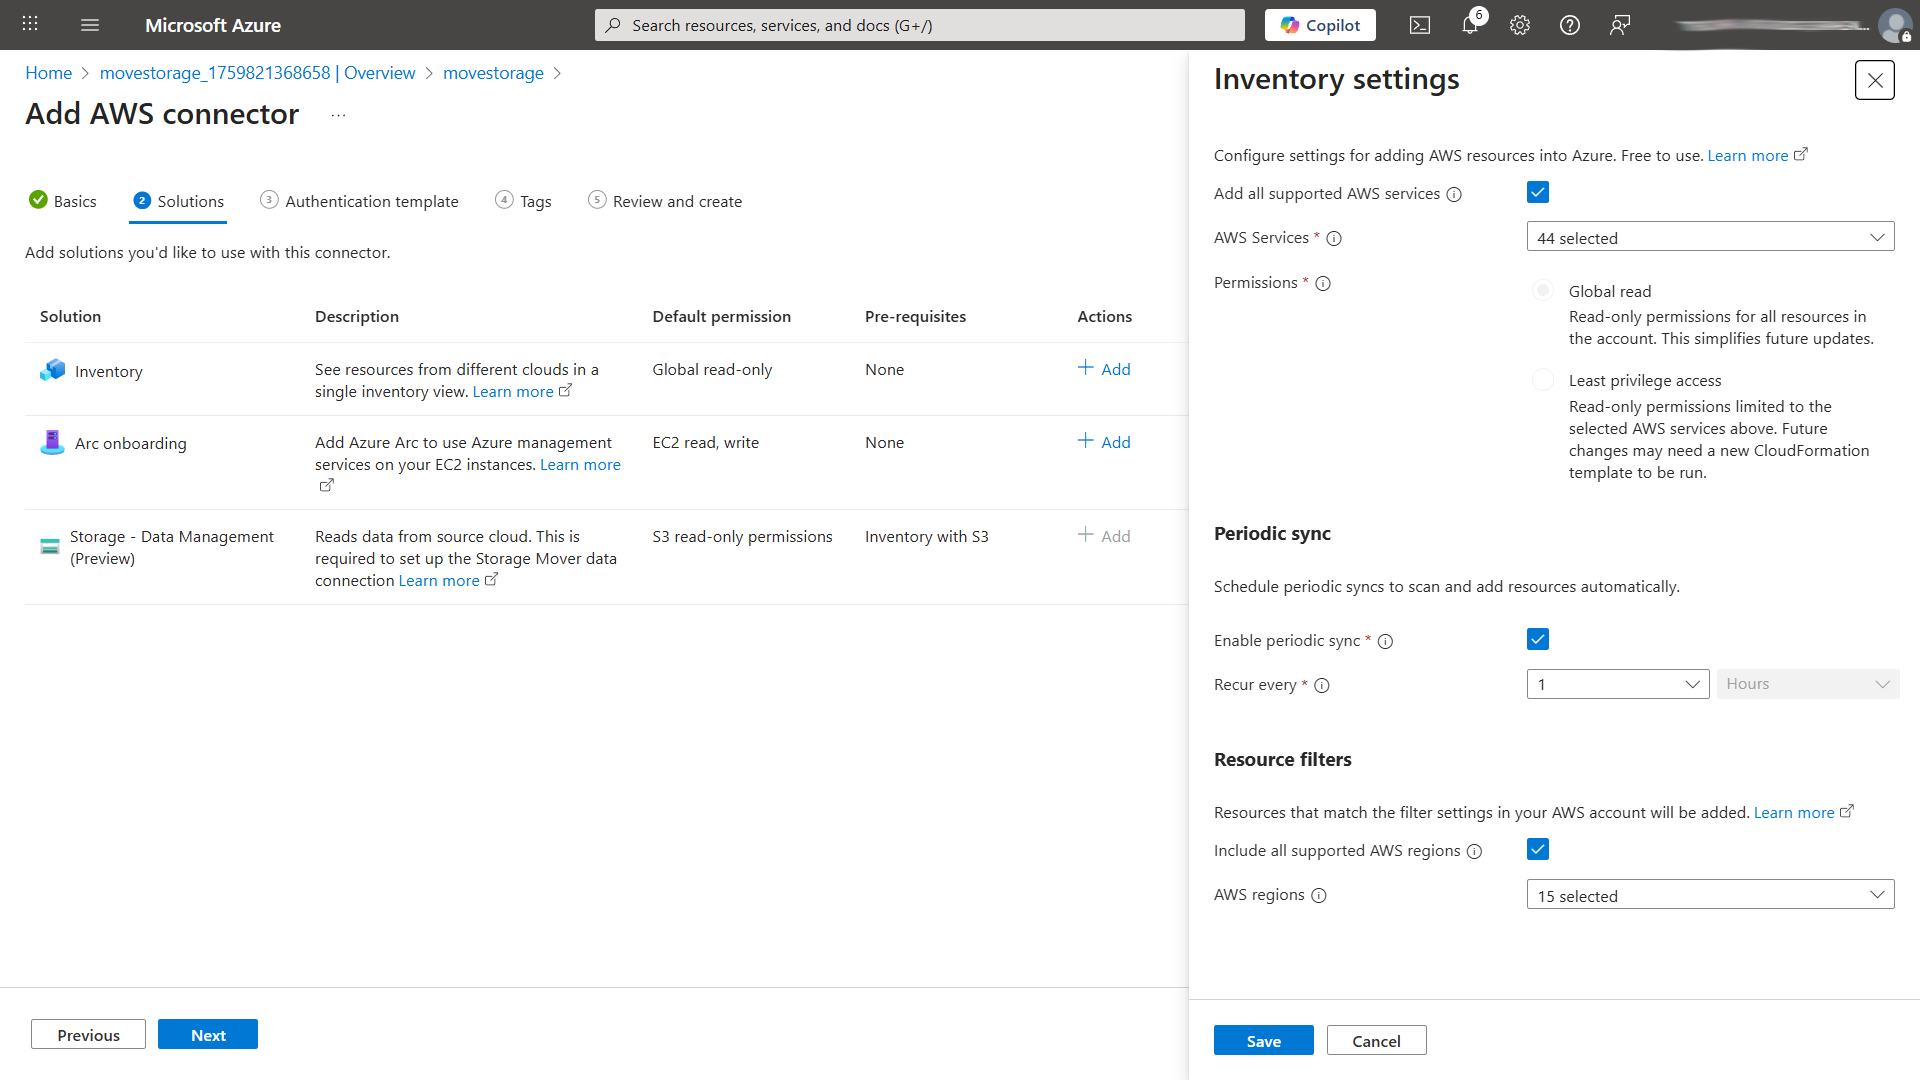
Configure as appropriate to your organisation and needs.
On the next screen, you will be given an AWS CloudFormation template to download or copy. You should take this and deploy it within your AWS environment, then come back and complete the wizard within Azure.
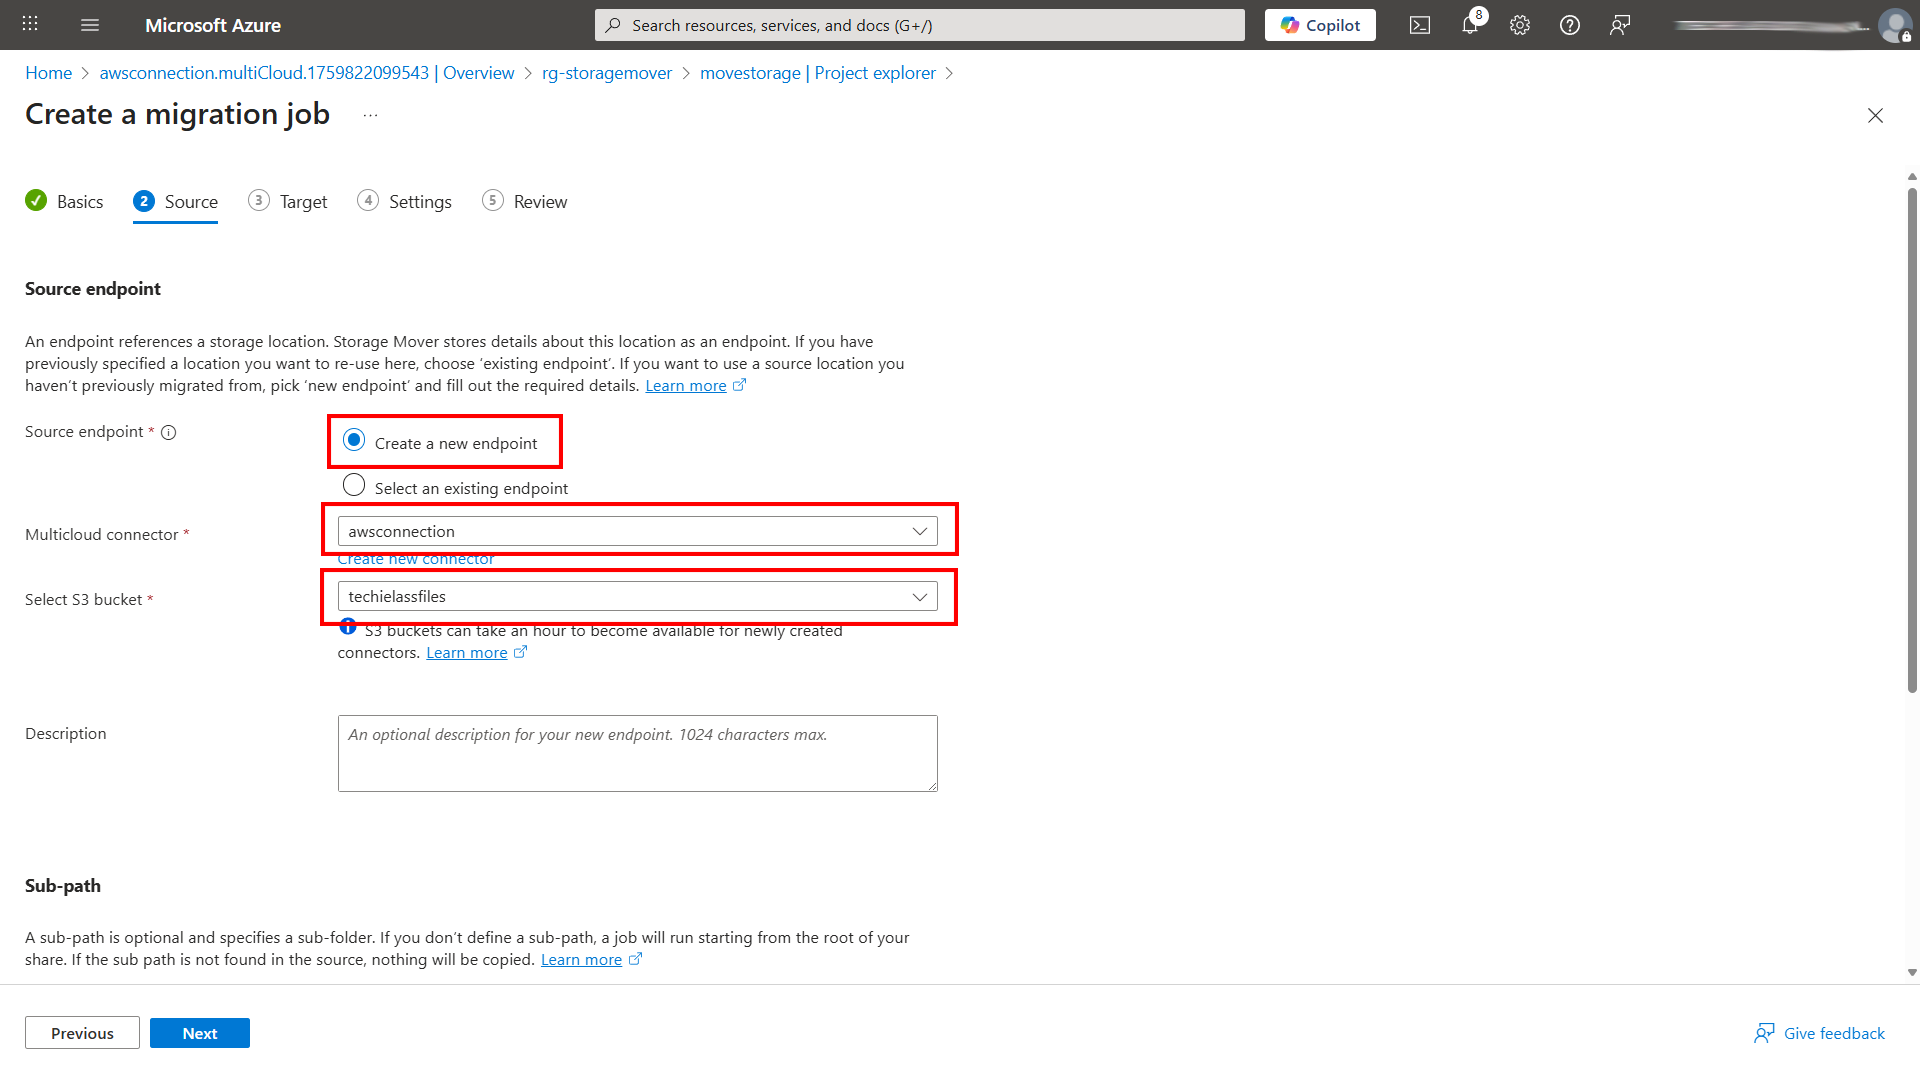
Configure source and target endpoints
Now that your AWS connector is set up and configured. You need to concentrate on your source and target endpoints. Now it’s assumed that you already have an endpoint in AWS, which will be an S3 account filled with files and folders.
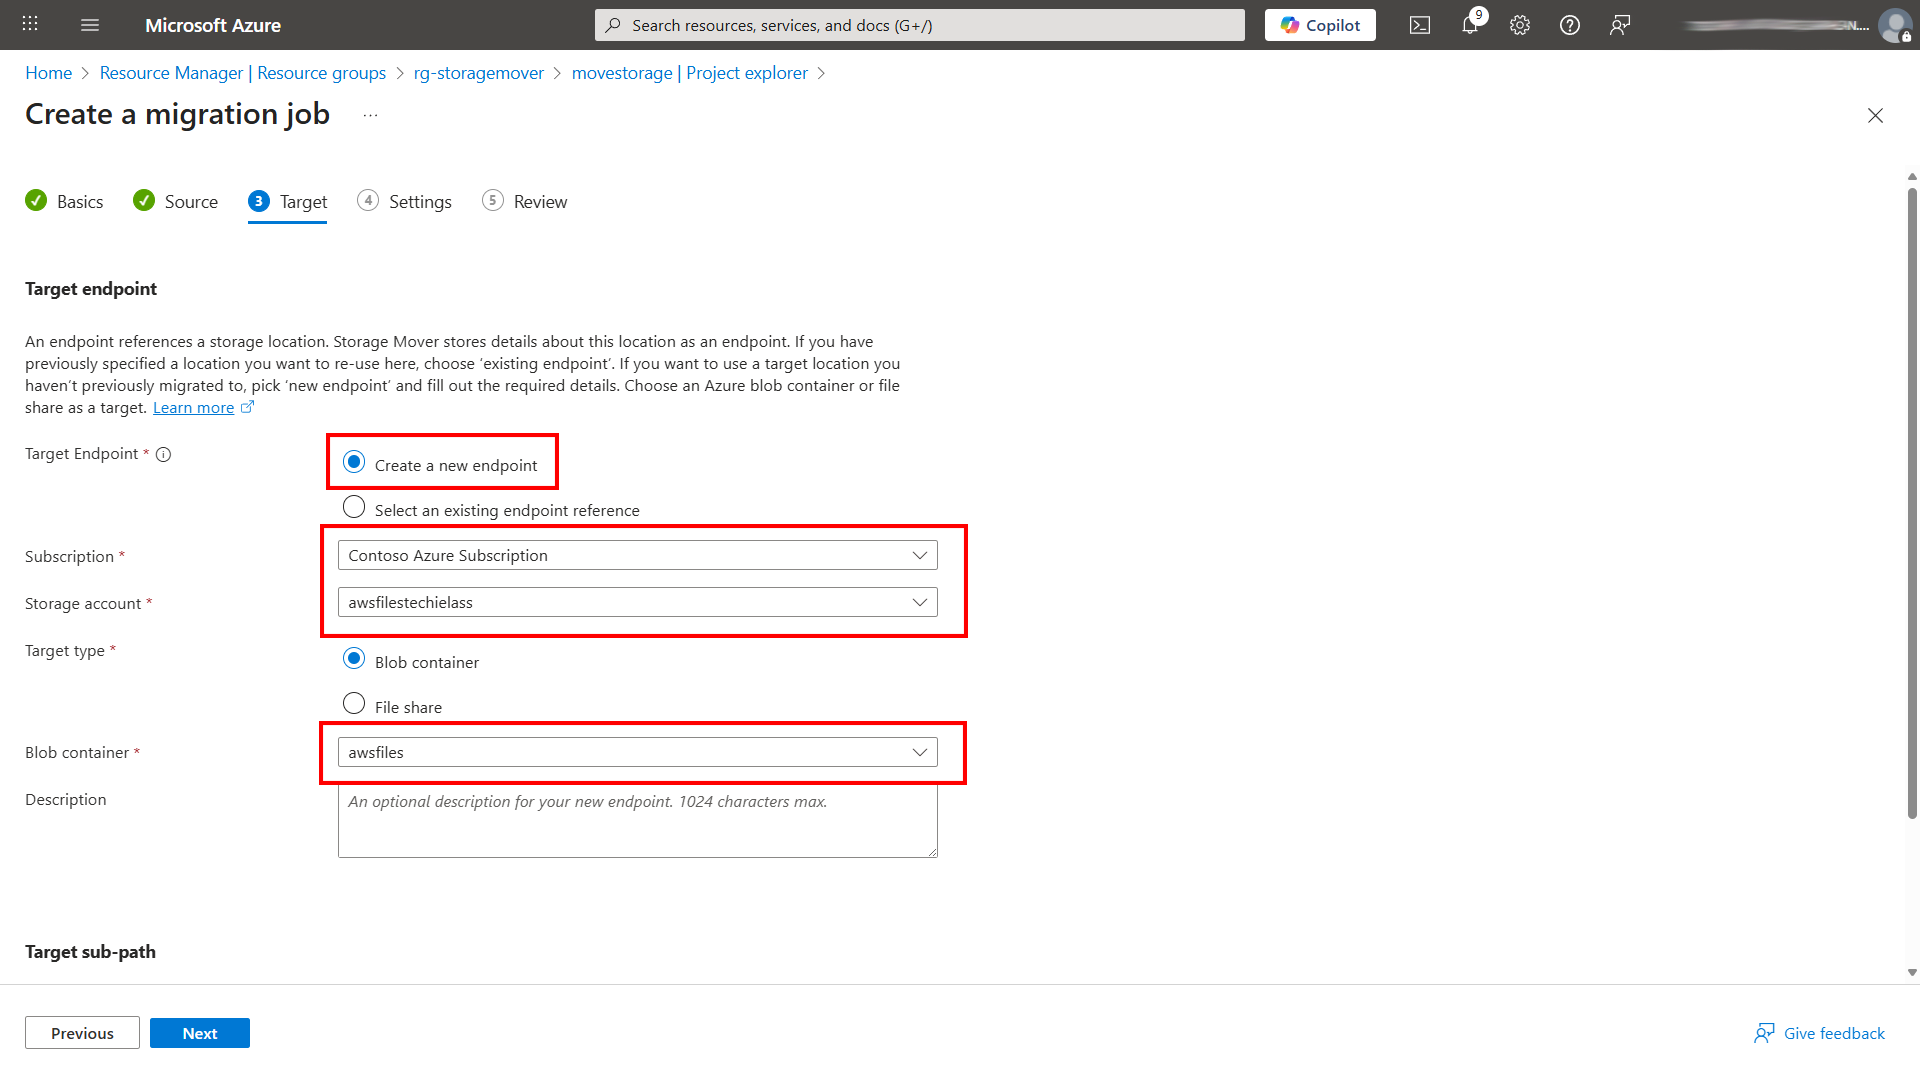
If you don’t already have an Azure Storage account set up to receive the data, now is the time to do that. Also set up a container or file share within the storage account that you want the data to move to.

Configure project and job definitions
The setup is now complete, so it’s time to create a migration project and job definition.
A project allows you to organise large migrations into smaller, more manageable chunks, while a job describes resources and migration options. For example you can have a job set up to migrate a specific folder within the S3 bucket to a specific Azure Storage blob container and then set up another job to move other folders to an Azure Storage file share.
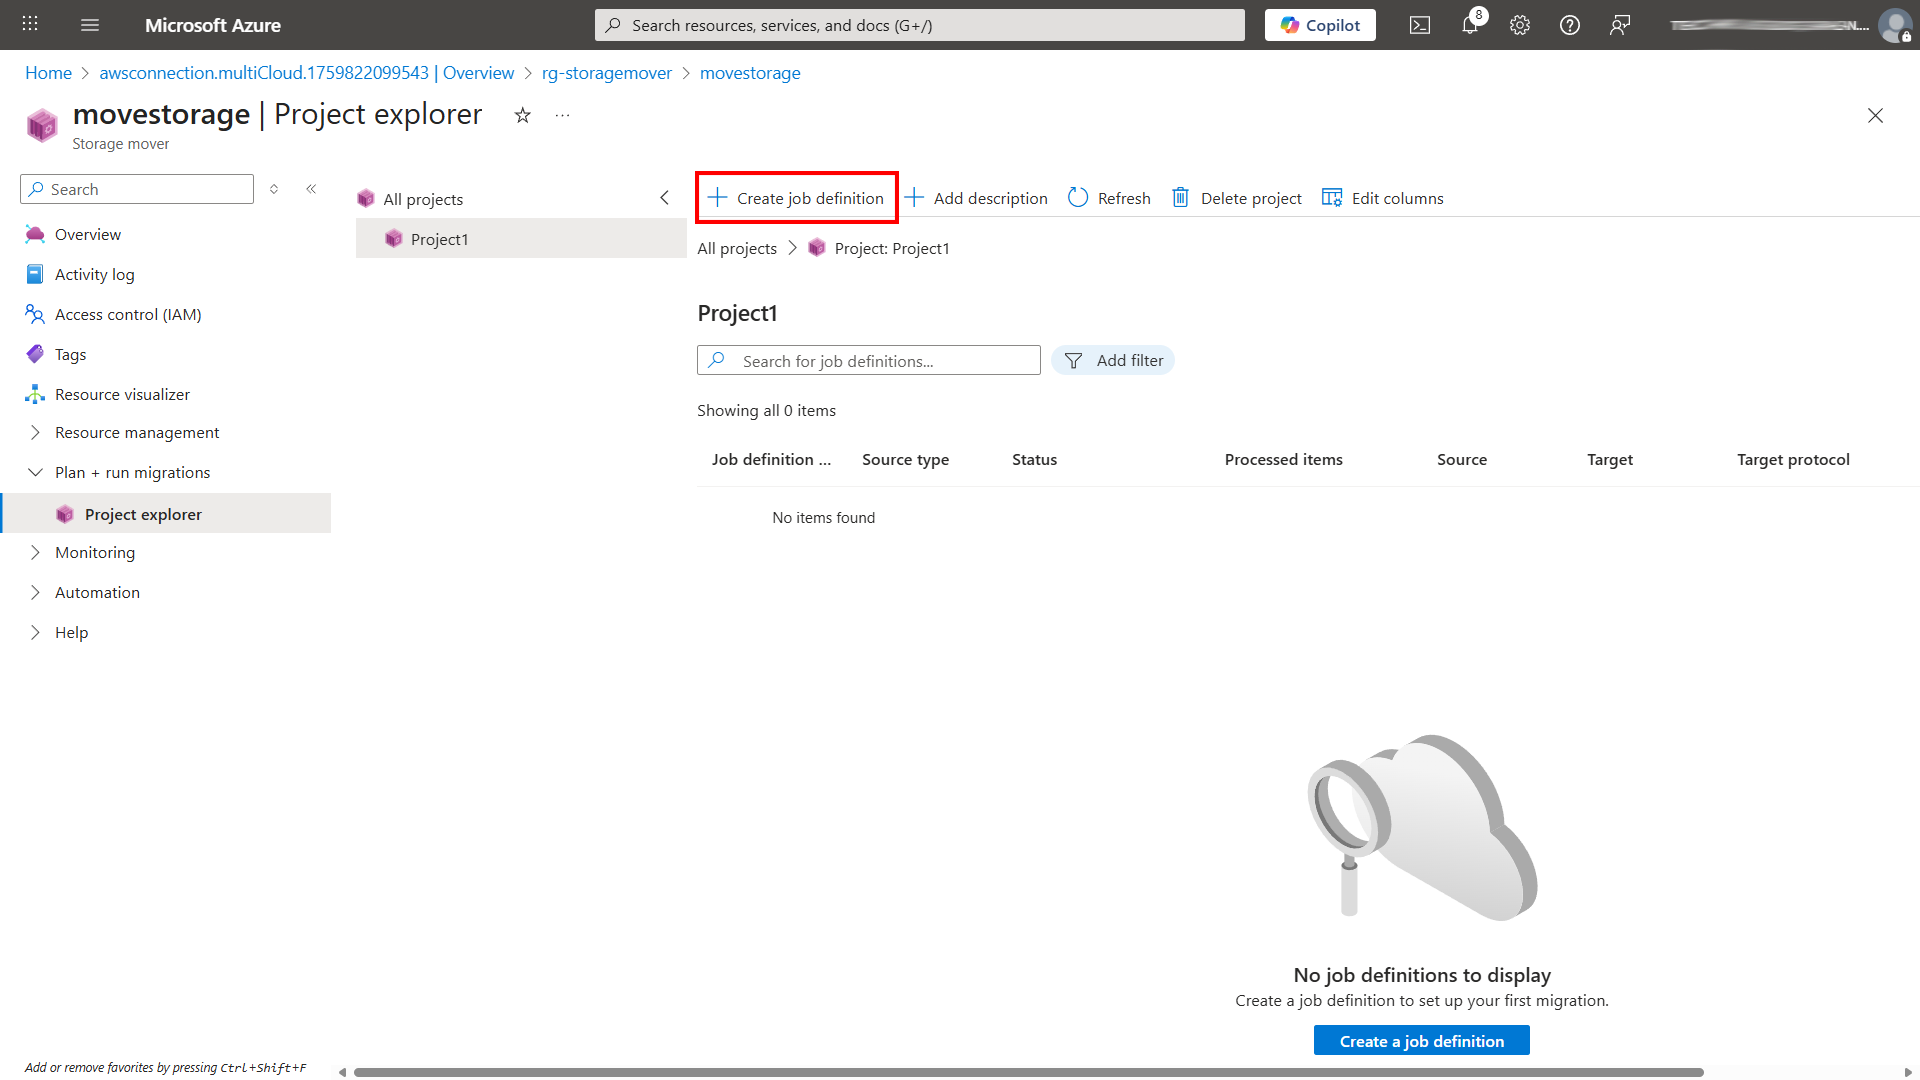
Within your Storage Mover resource click on Project Explorer on the left hand side. Then click on Create Project. Give your project a name and description and create.

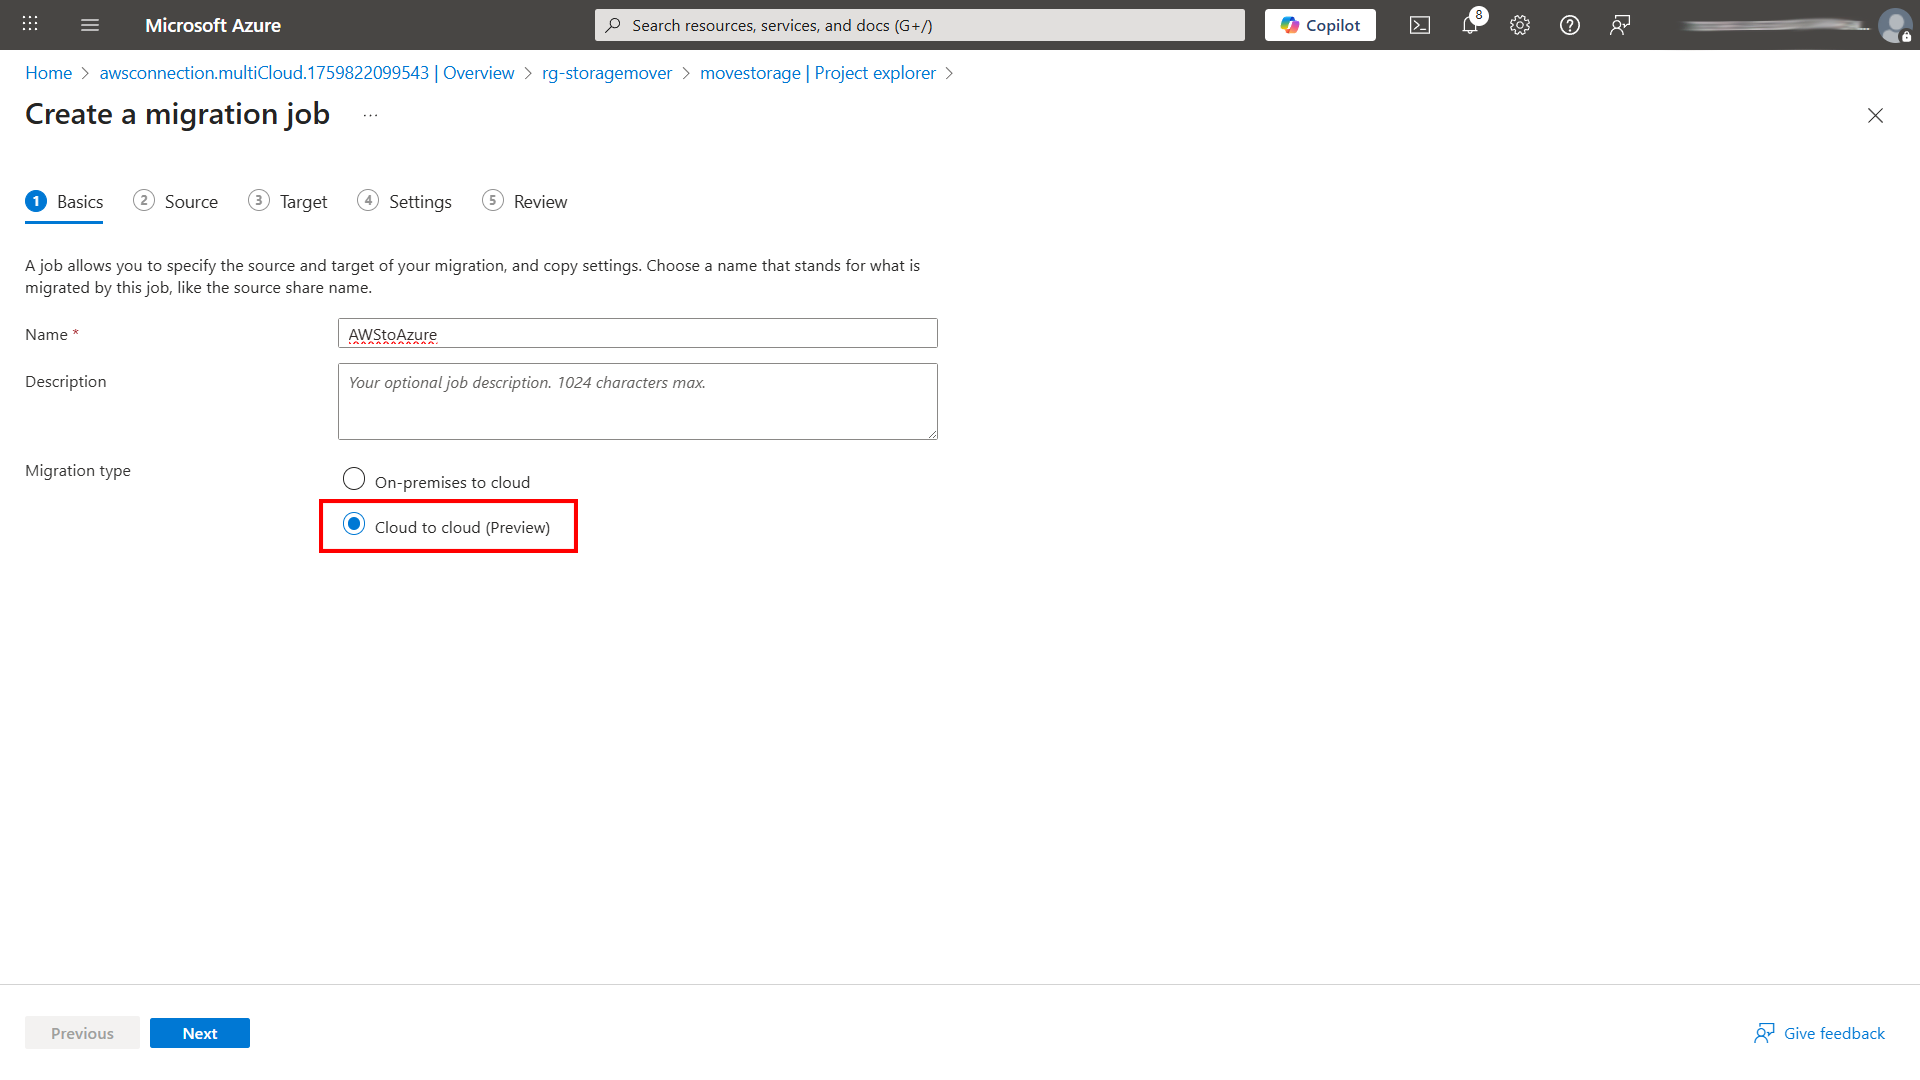
Once your project is created, click within it and then click on Create job definition.
You’ll first be asked to give your job a name and description then asked to define the migration type, in this example we’re using cloud to cloud (preview).
The next questions ask about the source, this is where you can define which S3 bucket you are moving data from. You have the option to take the whole bucket, or specific folders.
Once you’ve configured this move to the next screen to configure the target, or Azure storage account you wish the files to move to. You have the choice of moving them to a Blob container or a File share within the storage account. And you also have the choice of defining a specific folder within either to move the files.
The last screen you need to select an option in is what type of copy you want to do, a Merger content into target or Mirror source to target. Understand which option suits your scenario best.
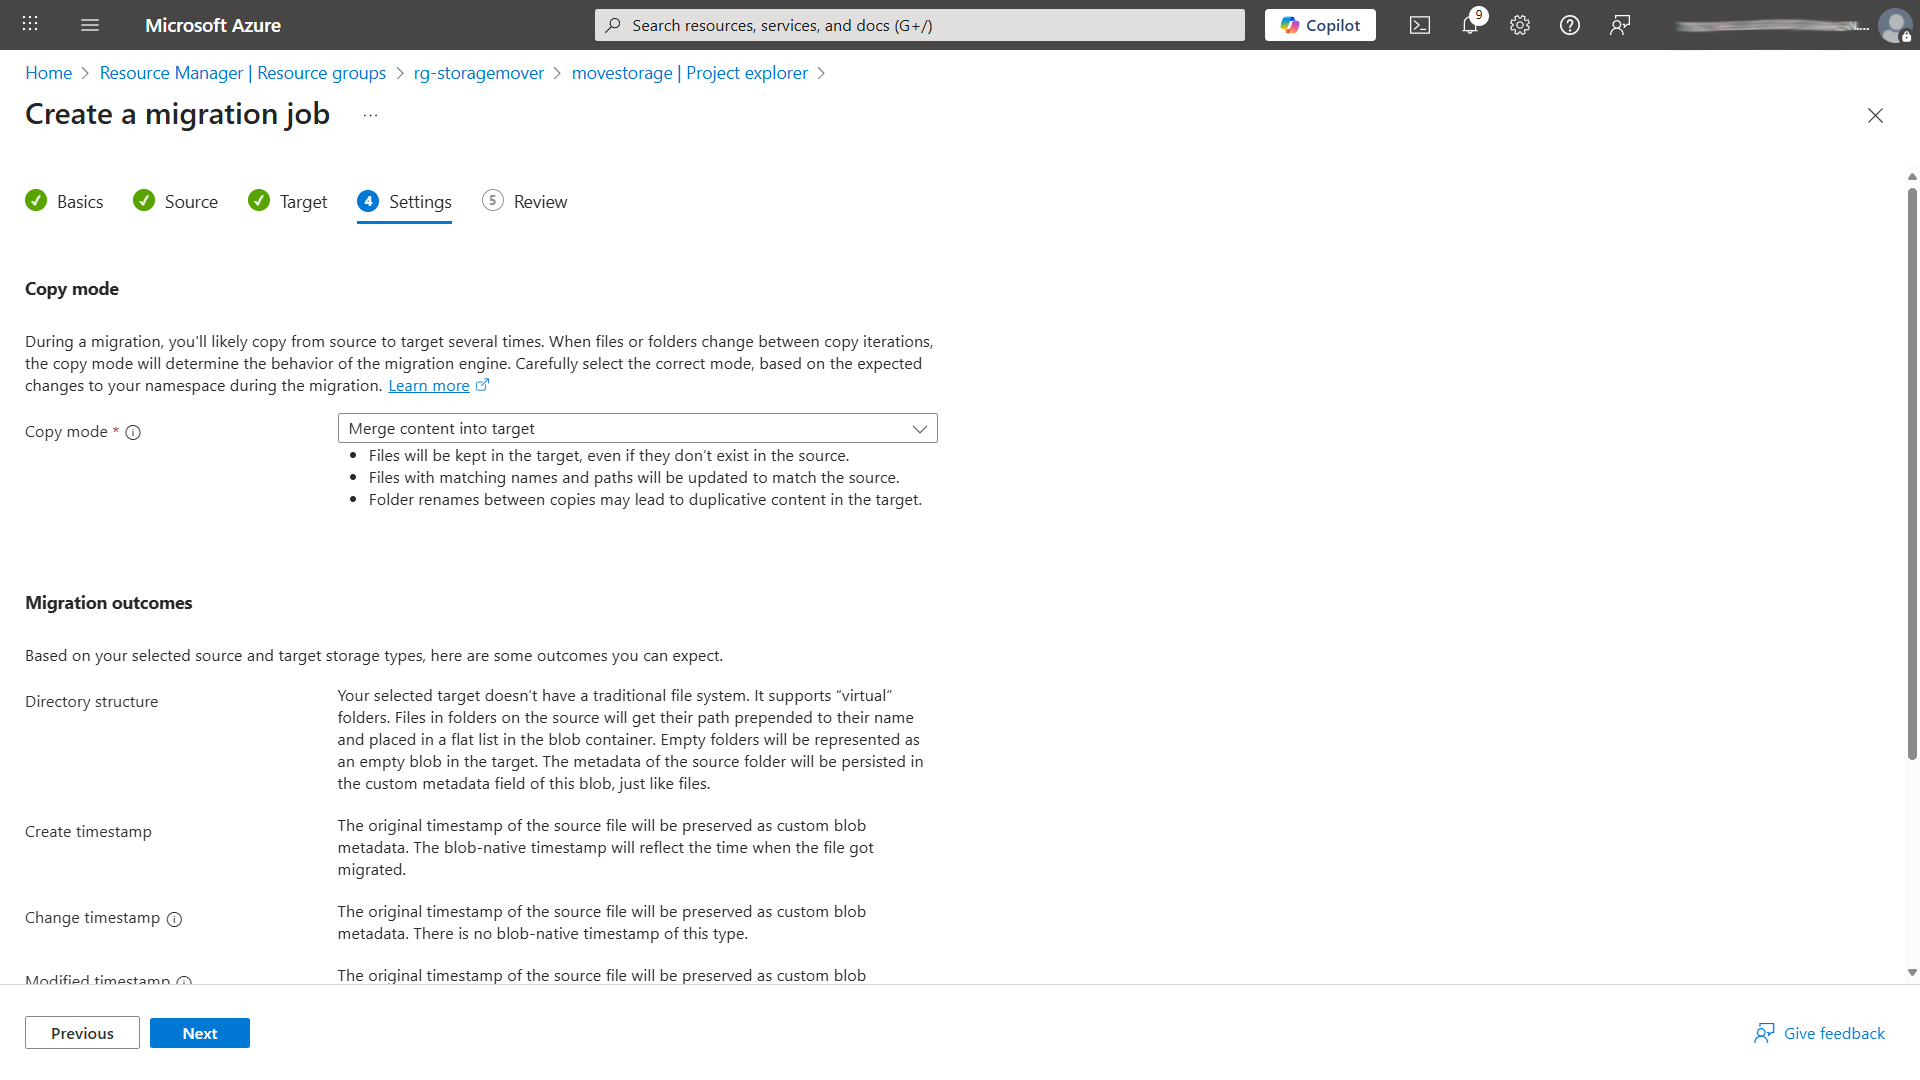
Mirror source to target: Makes the target an exact copy of the source. Extra files in the target are deleted, and everything else is updated to match the source.
Merge content into target: Updates files in the target to match the source but keeps any extra files already in the target. Renamed folders can sometimes create duplicates.
Once you’ve configured the job and it’s created you can now start it running.
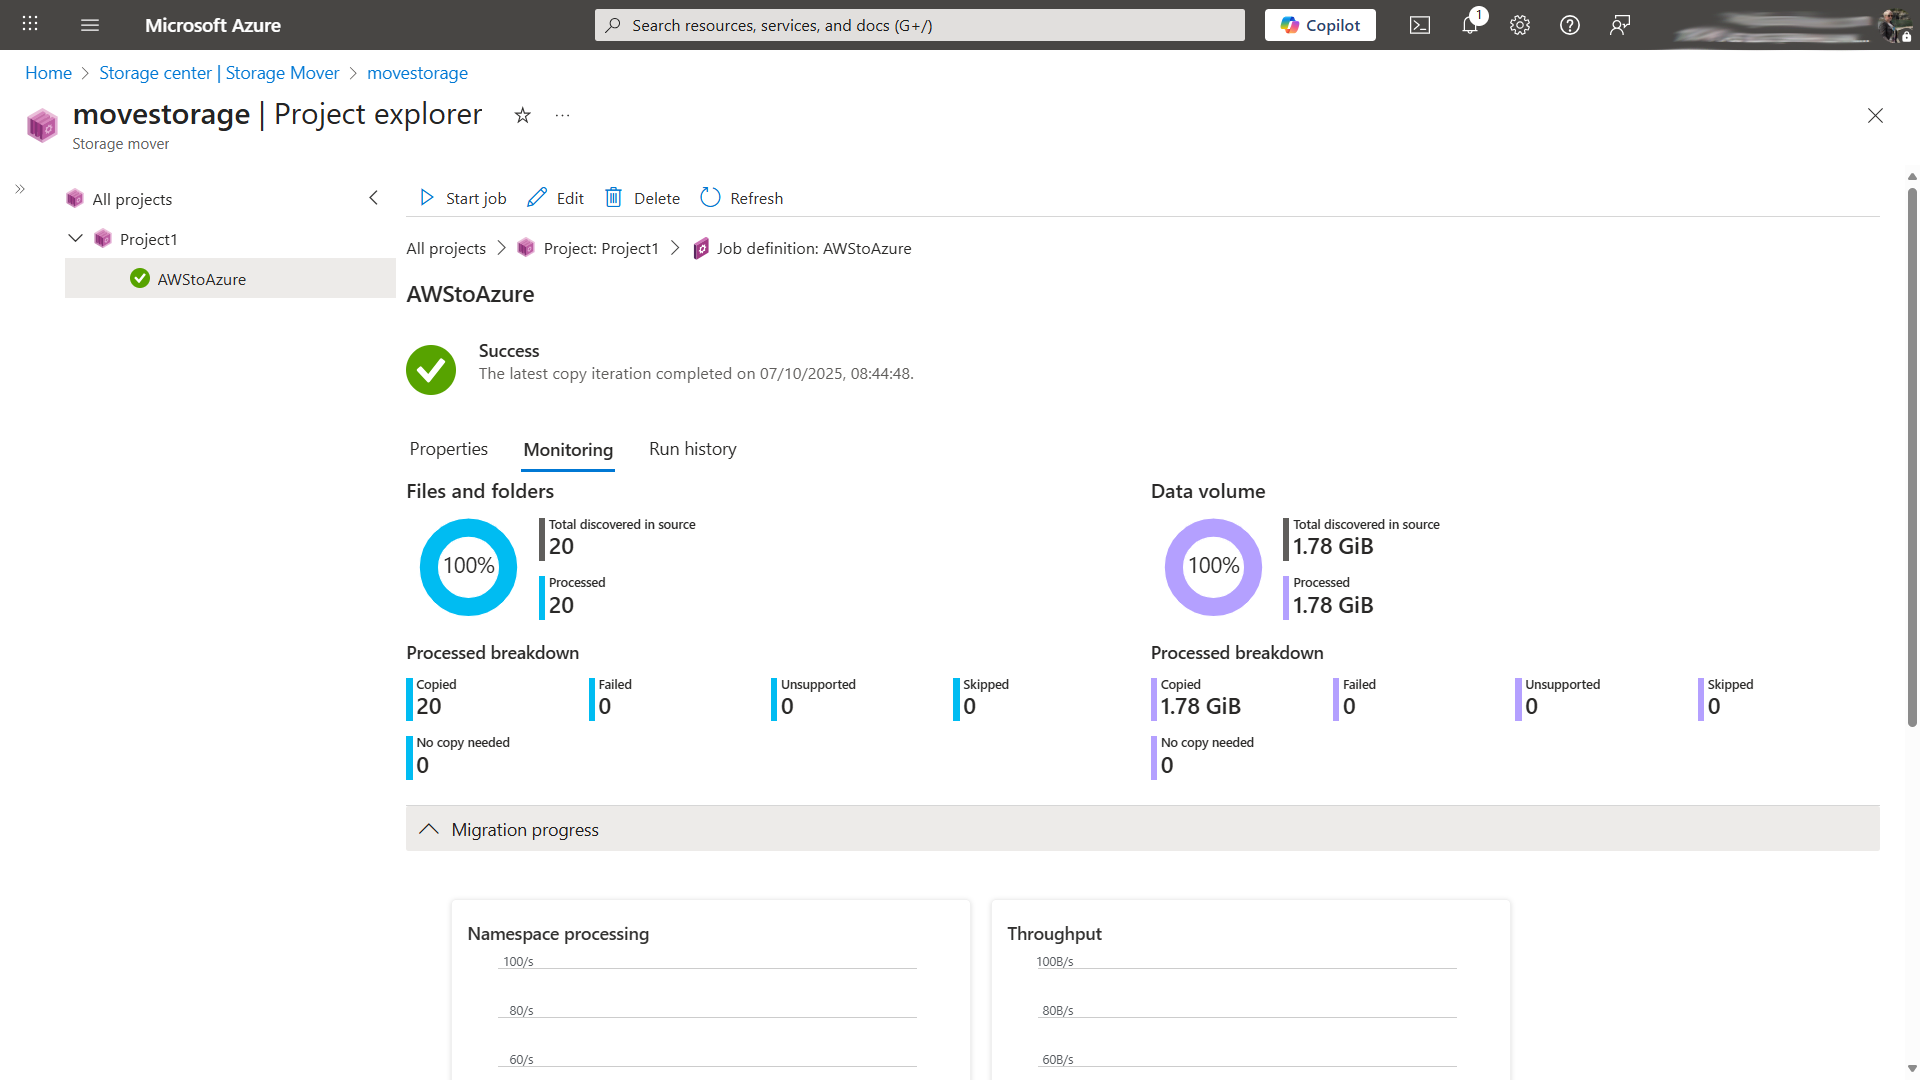
Monitor migration progress
Within the Azure Storage Mover blade itself, you can see some visual progress of your jobs, successful jobs, failed jobs, files copied, files failed, etc.
And if you set up logs to go Log Analytics you are able to query logs there as well.
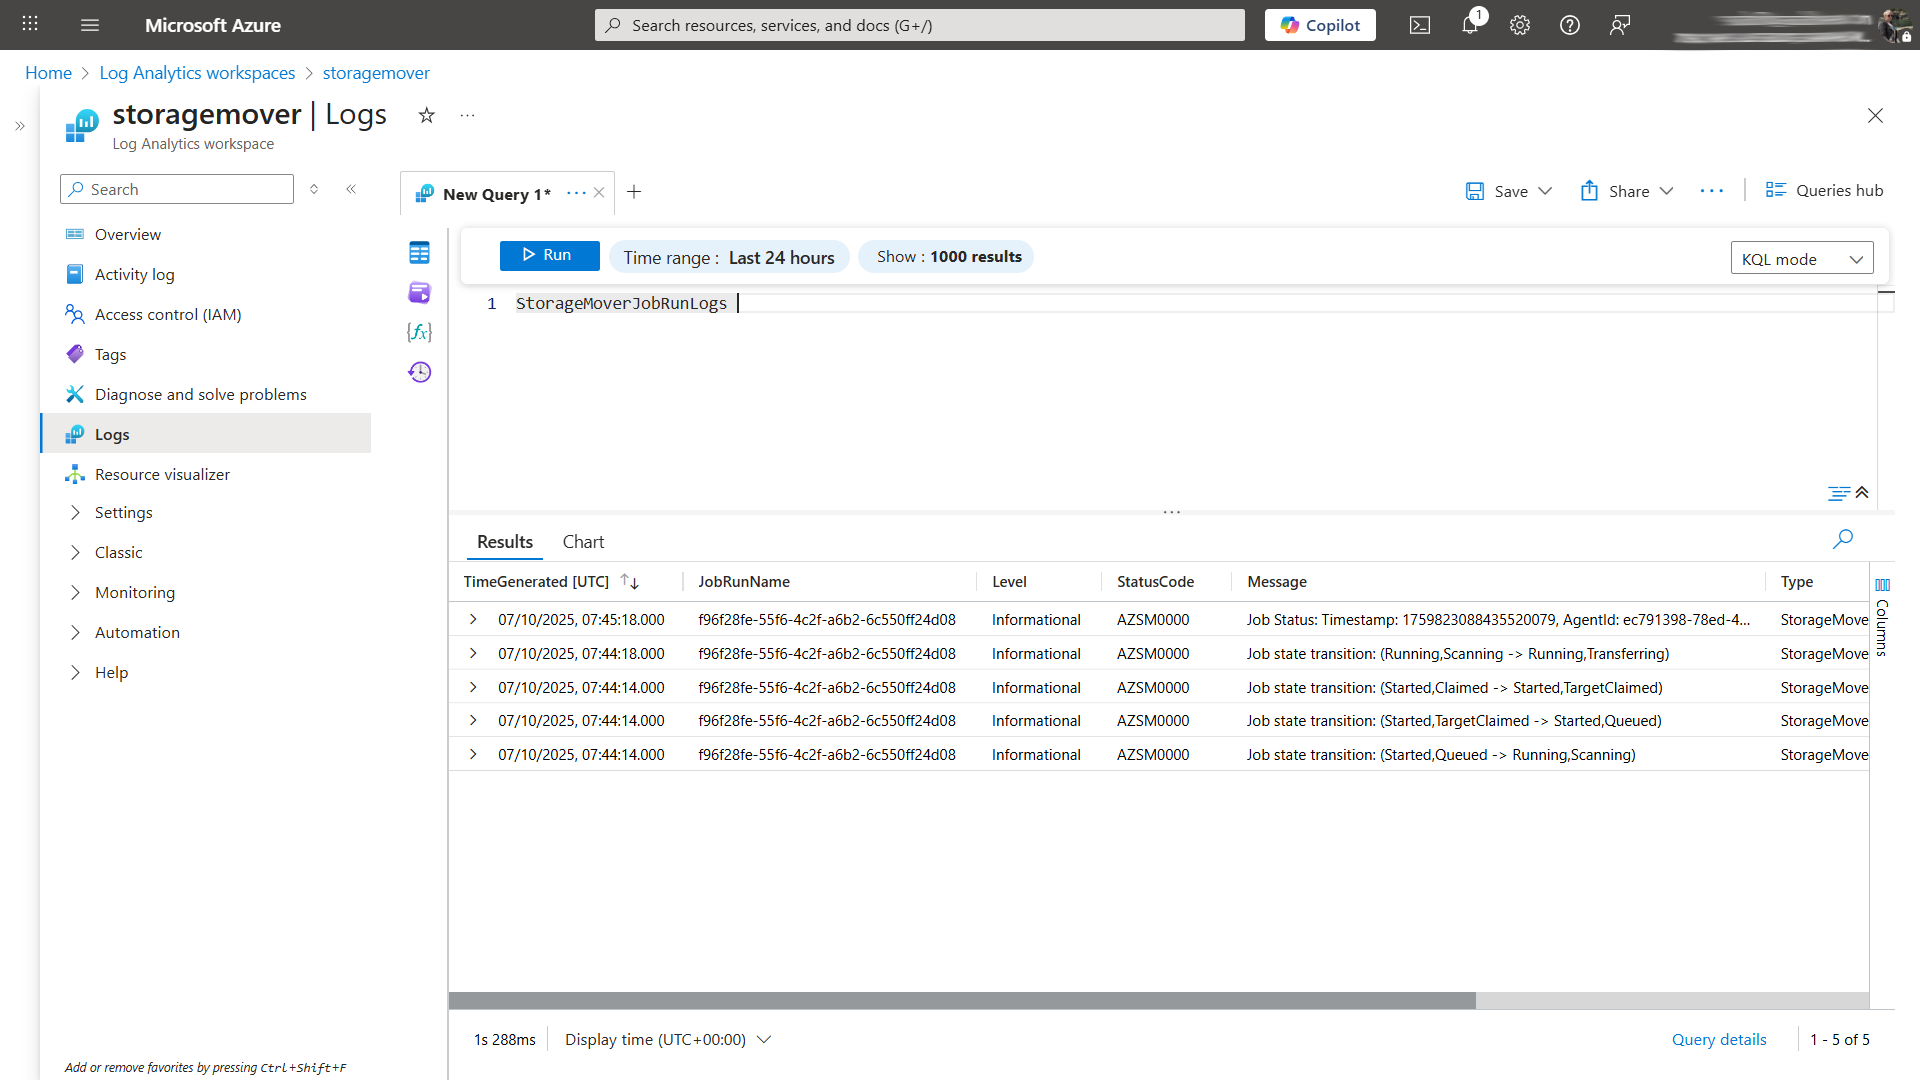
If you run the KQL query StorageMoverJobRunLogs within your Log Analytics workspace you will see all the jobs that have run, success or failure.
For more sample KQL queries to use, you can check out the official documentation.
Running regular syncs
The Azure Storage Mover is great if you need to sync files once, and you can do multiple syncs. For example, you can run the job initially to get the files into Azure, but then if you want to do a delta sync a week later, you can run your job manually again.
If you wish to run the job on a schedule or automate the running of it. You can use the Azure CLI command:
az storage-mover job-definition start-job \
  --resource-group <resource-group-name> \
  --storage-mover-name <storage-mover-name> \
  --project-name <project-name> \
  --job-definition-name <job-definition-name>
Or you can use the PowerShell command:
Start-AzStorageMoverJobDefinition `
  -ResourceGroupName <resource-group-name> `
  -StorageMoverName <storage-mover-name> `
  -ProjectName <project-name> `
  -JobDefinitionName <job-definition-name>
Both commands need the following parameters defined:
--resource-group: The name of the resource group containing your Storage Mover resource.
--storage-mover-name: The name of your Storage Mover resource.
--project-name: The name of the project within your Storage Mover.
--job-definition-name: The name of the job definition you wish to execute.
Final thoughts
Azure Storage Mover can help make cloud migrations easier, more secure and flexible. Whether you need to move files from on-premises, another cloud or sync deltas regularly, Storage Mover gives you a fully managed and scalable solution.
The new cloud-to-cloud migration feature even though still in preview simplifies the transfer of data from Amazon S3 to Azure Blog Storage while still maintaining security and cloud.