Deploy Azure OpenAI with Terraform and use it in Microsoft AI Shell
Learn how to deploy Azure OpenAI Service using Terraform and securely configure Microsoft AI Shell to use your Azure-hosted GPT model.

There is a wealth of AI tools available to use nowadays. One I have been exploring recently is AI within my command line. The tool that helps me do that is Microsoft AI Shell.
Microsoft AI Shell brings AI into your command line to help you either learn a language or assist you in writing commands. In a previous post, “Install and Use Microsoft AI Shell”, I walked through how to get AI Shell up and running.
In this blog, I will walk you through the journey of deploying Azure OpenAI Service using Terraform, retrieving the required endpoints and keys, and configuring Microsoft AI Shell to use your Azure-hosted GPT model securely from the command line.
Deploying Azure OpenAI Service via Terraform
In order to use the OpenAI-GPT agent within the AI Shell you will either need a public OpenAI API key or an Azure OpenAI deployment.
There are two things needed to begin a chat experience with Azure OpenAI Service, an Azure OpenAI Service account and an Azure OpenAI Deployment.
- The Azure OpenAI Service account - the Azure resource that hosts models.
- The Azure OpenAI Deployment - a specific model instance you can invoke via API.
Rather than clicking through the Azure Portal we can use Terraform to deploy everything we need in a repeatable, auditable way.
Prerequisites
Before you begin, ensure you have the following:
- An active Azure subscription
- Azure CLI installed
- Terraform installed
- Proper permissions to create resources in your Azure subscription
Terraform Template
Our Terraform template will:
- Create an Azure OpenAI (AI Services) account
- Assign a system-managed identity
- Deploy a GPT-4o model
Our main.tf file will look like this:
##
# Terraform Configuration
##

terraform {
  required_version = ">= 1.10.0"
  required_providers {
    azurerm = {
      source  = "hashicorp/azurerm"
      version = ">= 4.57.0, < 5.0.0"
    }
    random = {
      source  = "hashicorp/random"
      version = ">= 3.7.2, < 4.0.0"
    }
    azapi = {
      source  = "Azure/azapi"
      version = ">= 2.8.0, < 3.0.0"
    }
  }
}

provider "azapi" {
  # Configuration options
}

provider "azurerm" {
  features {}
  subscription_id = var.azure_subscription_id
}

# This ensures we have unique CAF compliant names for our resources.
module "naming" {
  source  = "Azure/naming/azurerm"
  version = "0.3.0"
}

# This is required for resource modules
resource "azurerm_resource_group" "rg" {
  location = var.location
  name     = module.naming.resource_group.name_unique

  tags = {
    Environment = var.tag_environment
    Project     = var.tag_project
    Creator     = var.tag_creator
  }
}

resource "azurerm_cognitive_account" "openai_service" {
  name                = var.aiserviceaccountname
  location            = var.location
  resource_group_name = azurerm_resource_group.rg.name
  kind                = "AIServices"
  sku_name            = var.sku

  identity {
    type = "SystemAssigned"
  }
}

resource "azurerm_cognitive_deployment" "azopenaideployment" {
  name                 = var.modeldeploymentname
  cognitive_account_id = azurerm_cognitive_account.openai_service.id

  model {
    format  = "OpenAI"
    name    = var.model
    version = var.modelversion
  }

  sku {
    name     = "Standard"
    capacity = var.capacity
  }
}

resource "azapi_update_resource" "openai_custom_subdomain" {
  type        = "Microsoft.CognitiveServices/accounts@2025-10-01-preview"
  resource_id = azurerm_cognitive_account.openai_service.id

  body = {
    properties = {
      customSubDomainName = var.custom_subdomain_name
    }
  }

  depends_on = [
    azurerm_cognitive_account.openai_service
  ]
}
We also have a variables.tf file
##
# Variables
##

##
# Common Variables
##
variable "tag_environment" {
  type        = string
  description = "The environment for the resources"
  default     = "Testing"
}

variable "tag_project" {
  type        = string
  description = "The project for the resources"
  default     = "Foundry"
}

variable "tag_creator" {
  type        = string
  description = "The creator for the resources"
  default     = "TechieLass"
}

variable "location" {
  type    = string
  default = "UK South"
}

variable "azure_subscription_id" {
  description = "Azure subscription ID"
  type        = string
  sensitive   = true
}

variable "aiserviceaccountname" {
  type        = string
  description = "Name for the Azure AI (Cognitive) account"
}

variable "sku" {
  type        = string
  description = "SKU name for the Azure AI (Cognitive) account (e.g. S0)"
  default     = "S0"
}

variable "modeldeploymentname" {
  type        = string
  description = "Name for the model deployment"
  default     = "techielassmodel"
}

variable "model" {
  type        = string
  description = "Model name (e.g. gpt-4o, gpt-5)"
  default     = "gpt-4o"
}

variable "modelversion" {
  type        = string
  description = "Model version identifier"
  default     = "2024-11-20"
}

variable "capacity" {
  type        = number
  description = "Deployment capacity units"
  default     = 10
}

variable "custom_subdomain_name" {
  description = "Custom domain name for the Azure AI Services endpoint"
  type        = string
}
A few things to call out:
- The customSubDomaName must be globally unique and this isn’t a domain name like sarah.com, it’s a name for your service.
- Capacity requirements vary by model, check Azure OpenAI quotas if deployment fails.
Deploying the Terraform Template
To deploy the Terraform template we should first create a new file within our project folder called “terraform.tfvars”, this file will allow us to define our variables for deployment. If you are unfamiliar with the tfvars file check out my post “What is a tfvars file in Terraform and how do you use it?”.
Within your tfvars file, add the following:
tag_creator           = "YourName"
tag_environment       = "EnvironmentName"
tag_project           = "ProjectName"
location              = "AzureRegion"
azure_subscription_id = "YourSubcriptionID”
aiserviceaccountname  = "ServiceAccountName"
sku                   = "S0"
modeldeploymentname   = "ModelName"
model                 = "gpt-4o"
modelversion          = "2024-11-20"
capacity              = 10
custom_subdomain_name = "SubDomainName"
Once you have created the tfvars file, you can move on to deploying it.
The first command you should run is:
terraform init
You can then either run terraform plan to review the deployment, or start the deployment using:
terraform apply -auto-approve
Once the deployment has completed, run the following commands. These will retrieve the information you need to configure AI Shell to use this deployment.
# Retrieve the Azure OpenAI service endpoint and API key.
az cognitiveservices account show --name <account name> --resource-group <resource group name> --query "properties.endpoint" -o tsv
# Retrieve the Azure OpenAI endpoint and API key.
az cognitiveservices account keys list --name <account name> --resource-group <resource group name> --query "key1" -o tsv
Save the outputs as you will need them later on.
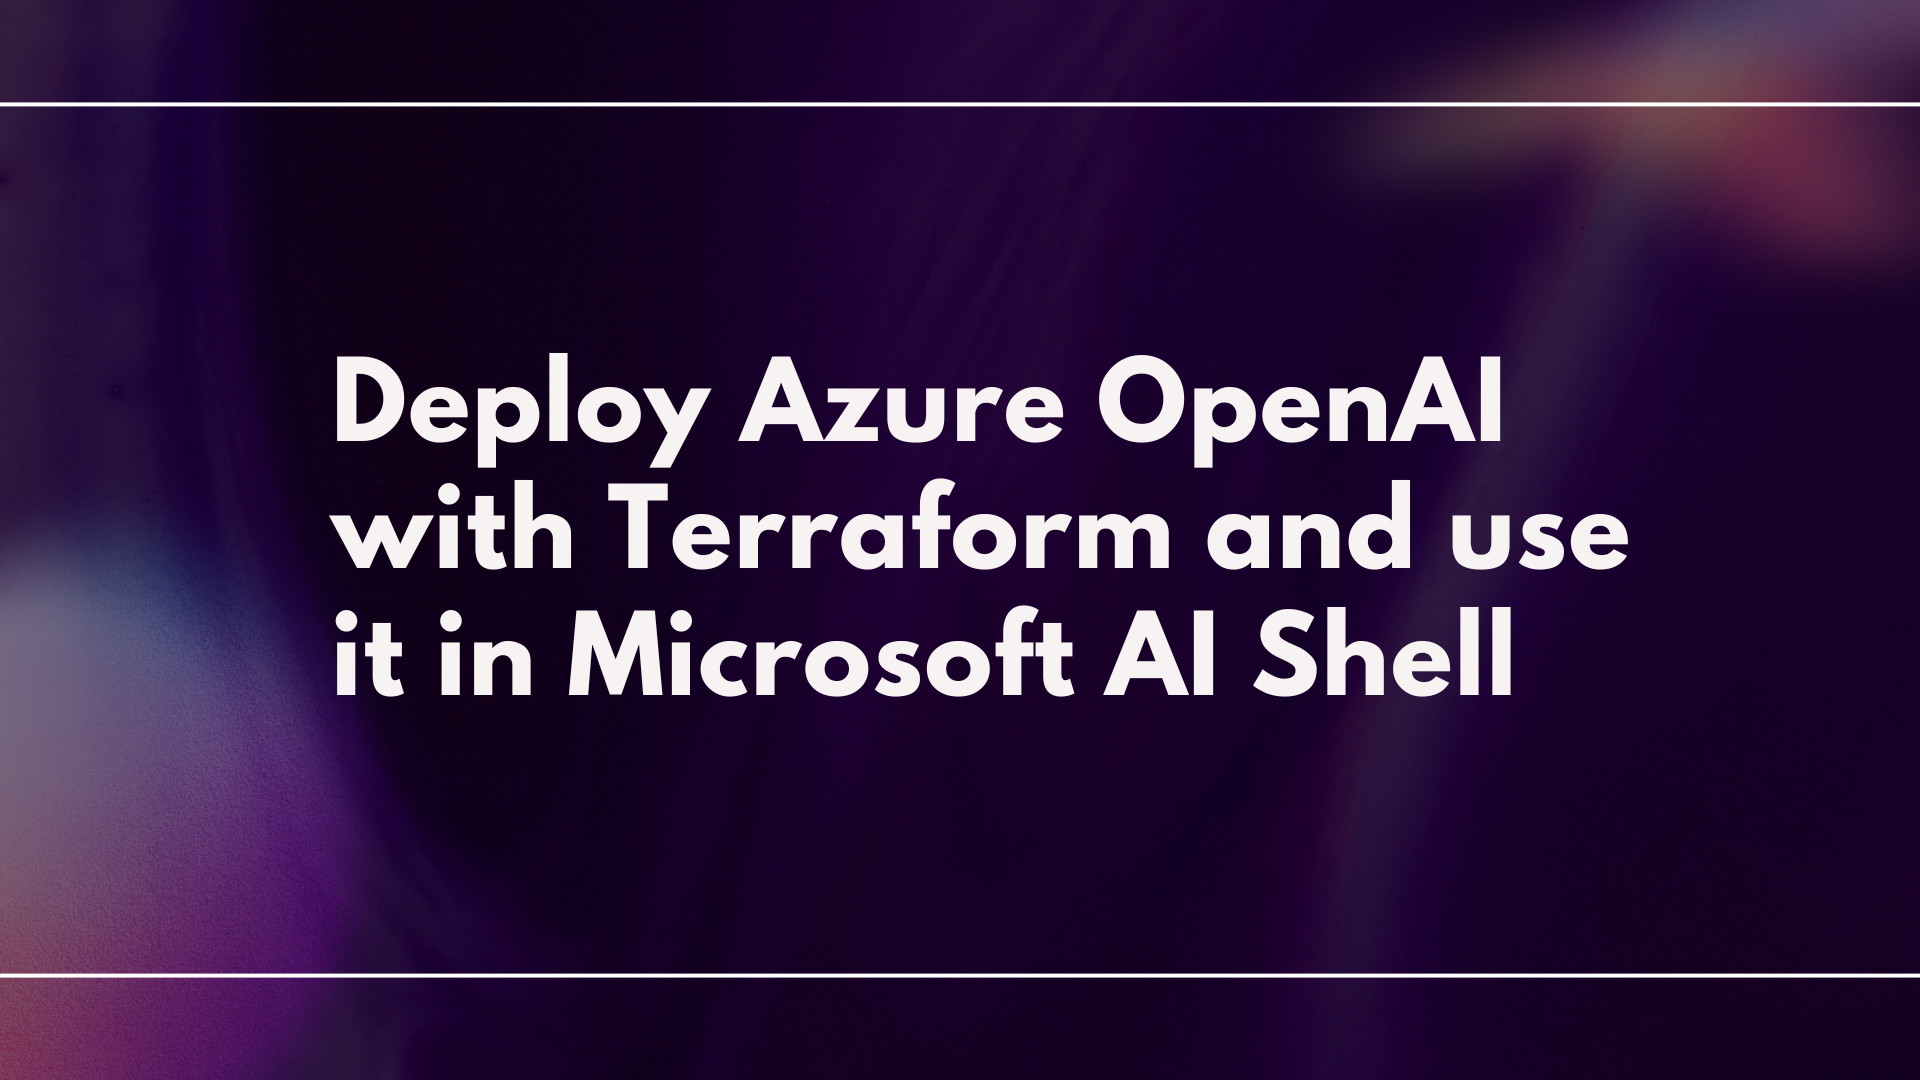
Configure AI Shell
Open up your terminal and start the AI Shell.
Select openai-gpt
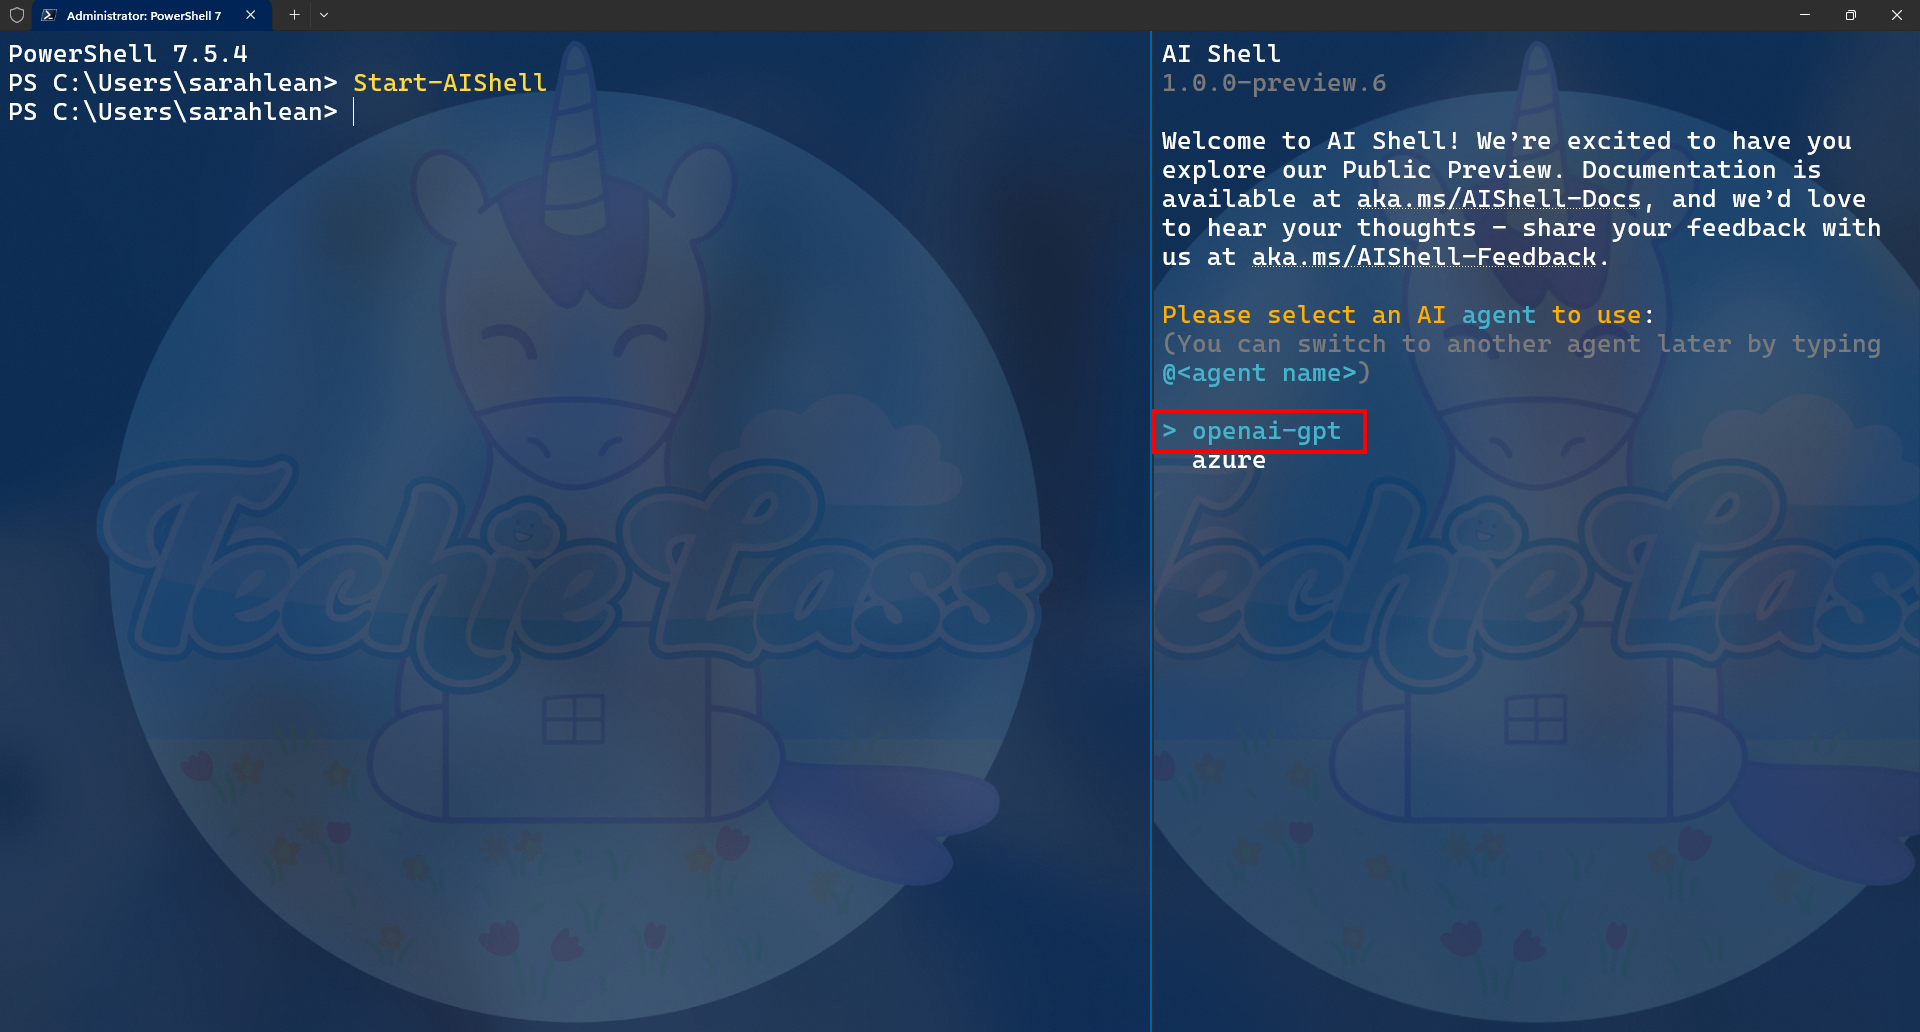
Then type in
/agent config
A JSON file should open.
Configure the JSON with the information below, using the endpoint and key values you saved earlier:
{
  // Declare GPT instances.
  "GPTs": [
      {
        "Name": "ps-az-gpt4o",
        "Description": "<insert description here>",
        "Endpoint": "<insert endpoint here>",
        "Deployment": "<insert deployment name here>",
        "ModelName": "gpt-4o",
        "Key": "<insert key here>",
        "SystemPrompt": "1. You are a helpful and friendly assistant with expertise in PowerShell scripting and command line.\n2. Assume user is using the operating system `osx` unless otherwise specified.\n3. Use the `code block` syntax in markdown to encapsulate any part in responses that is code, YAML, JSON or XML, but not table.\n4. When encapsulating command line code, use '```powershell' if it's PowerShell command; use '```sh' if it's non-PowerShell CLI command.\n5. When generating CLI commands, never ever break a command into multiple lines. Instead, always list all parameters and arguments of the command on the same line.\n6. Please keep the response concise but to the point. Do not overexplain."
      }
  ],
  // Specify the default GPT instance to use for user query.
  // For example: "ps-az-gpt4"
  "Active": "ps-az-gpt4o"
}
Save the file and then go back into your AI Shell. Type the command:
/refresh
You can now start to use your AI Shell with the AI model you just deployed.
Conclusion
Microsoft AI Shell is a great tool to integrate into your command line to assist with everyday tasks. Using Azure OpenAI Service alongside it means you retain control over your data, while deploying the service via Terraform gives you a repeatable and consistent way to provision resources whenever needed.