Manage Social Media Account Details using Azure AD
Manage your social media accounts through Azure AD!

As I'm sure you are aware I run a User Group which means I have a host of usernames and passwords to remember for the Social Media accounts attached to it as well as my own which can get a bit confusing and onerous at times. To get around this I make use of Azure Active Directory (AD) and Single Sign On for my Twitter, Eventbrite and MailChimp accounts. Also having to give out the password for these accounts to multiple people these days is considered "bad practice", as they could easily lock you of them in they become disgruntled, or leave your organisation. Within a corporate situation this could get quite messy. Managing access to these accounts and controlling the credentials from within your IT department can help to ease some of these headaches. I'm going to walk you through the process of controlling Social Media Account access using Azure AD.
Grant access to users
Within this blog post I will assume that you are reasonably familiar with using the Azure Portal.
- The first step is to log into the Azure Portal as a Global Administrator - https://portal.azure.com
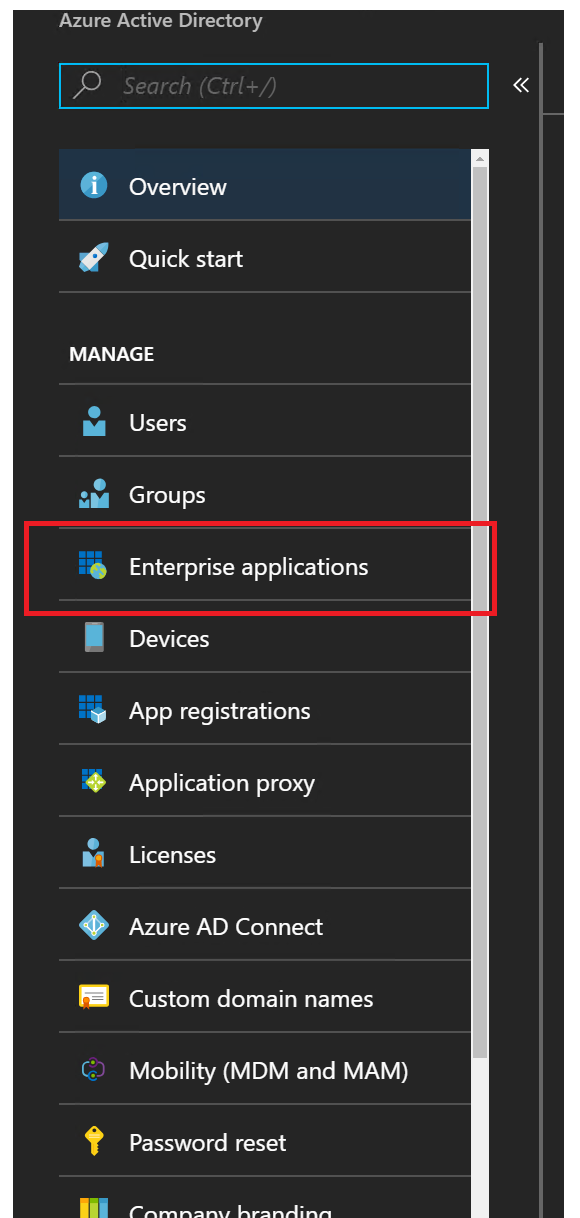
- Search for the Azure Active Directory Service
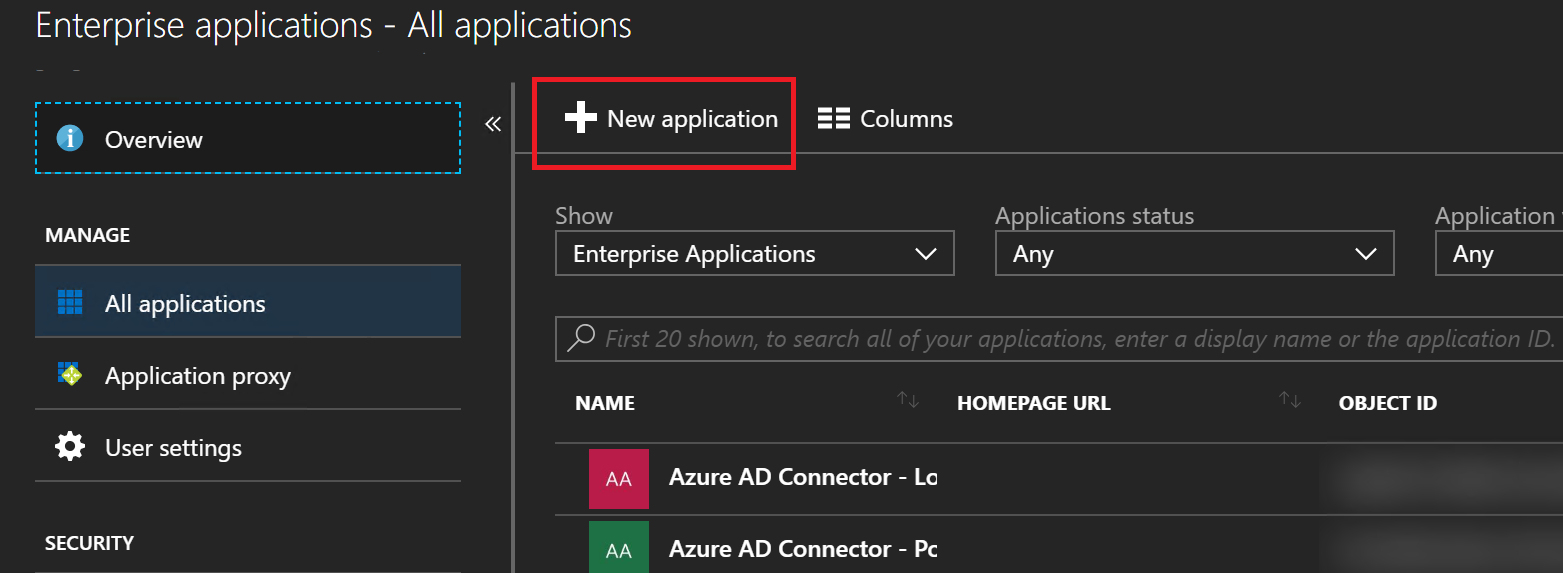
- Once the Azure AD blade loads click on Enterprise applications down the left hand side
- Click on **New Application
- Microsoft have over 2000 pre-built from Box to Workday, plus you can add your own if need be. In this example we are going to configure Twitter. So search for Twitter
- Once you find it and select it, the Add App blade will open, name it something appropriate. In my case I am going to name it UG Twitter.

- Once you've specified the name, click on Add
- It should take a few seconds to Add the App to your Tenant. Azure will automatically bring you to the "Quick Start" page. The first thing to do is click on Configure single sign-on

- Select Password-based Sign-On as the Single Sign-on Mode and click on Save
- Close the Single Sign-on blade
- Now click on ****Assign a user for testing !
- AzureAD - Assign User****
- When the Users and Groups blade opens click on Add user
- Search for a user that should have access to your Twitter account
- Once you have added a user you will notice that in the "Add Assignment" blade an extra option will appear called "Assign Credentials", click on this configuration option

- When the "Assign Credentials" blade opens click on Yes
- The blade will now ask you for a User Name and Password, type in your Twitter details and click OK

- Now click on Assign
- Repeat this process for other users that need to access the Twitter account.
Now that you have the back end configuration set up as it should be, how do you test it works or how do your end users make use of this setup? There are two options, you can browse to https://myapps.microsoft.com or use a browser extension. Microsoft have released an extension called My Apps Secure Sign-in that is available for Edge, Chrome and Firefox. To make use of this extension you need to meet certain criteria:
- Edge: on Windows 10 Anniversary Edition or later.
- Chrome: on Windows 7 or later, and on MacOS X or later.
- Firefox 26.0 or later: on Windows XP SP2 or later, and on Mac OS X 10.6 or later.
Using MyApps
Using the website is straight forward, you browse to https://myapps.microsoft.com and log in with your Azure AD/Office 365 credentials. When the site loads it will then show you a list of applications that are associated with your account you can access. In this example one of the applications is Twitter. Clicking on the application will open a new tab on your browser and redirect to the app. It will also send the credentials through that are stored within Azure AD and automatically log you in.
Using the My Apps Secure Sign-in Extension
To use the My Apps Secure Sign-in Extension it first needs to be installed within your browser of choice.
- Once the extension is installed on your browser you should see a small blue grid in the top right hand corner of your screen, when you click on that it will ask you to sign in to your Azure AD/Office 365 account

- Now that you are signed in click on My Apps
- This will open the My Apps website
- Click on the relevant application that you wish to visit
- It will launch a new tab and sign you into that application
- The next time you click on the My Apps Secure Sign-in Extension it will list your Recently Used apps which will negate the need to visit the My Apps website
Summary
This is a great feature that is available with Azure AD and one that should be utilised more in my opinion. It can help simplify your users working day and help to keep your accounts secure and safe. As always if you want to discuss this in more detail please do reach out to me on Twitter at @TechieLass