Deploy a lab inside an Azure VM
Deploy a Hyper-V lab inside and Azure virtual machine and replicate an on-prem environment.

In my day job I often take customers through demos or at conferences. I need a demo environment.
Three products that are often hard to demo are Azure Backup, Azure Migrate and Azure Site Recovery, Azure Arc. And over the years I’ve pulled together a few small environments to demo or use the products.
And then I ripped them down.
This takes a lot of time.
So I’ve invested the time in trying to automate the deployment of that environment.
What do I need
Within the products that I like to have demo environments for Azure Backup, Azure Migrate and Azure Site Recovery. Each product has similar requirements to operate, the Backup product needs something to backup (servers), the Migrate product needs something to discover and assess (servers) and Site Recovery needs something to replicate (servers).
So I need servers. In the past I've tried to use my (aging) HP Microserver at home as a lab environment, either running VMware or Hyper-V but that hasn’t worked out for so many reasons, so my solution is to take advantage of nested in Azure!
Nested virtualization has been supported on Azure since around July 2017, and currently all v3 virtual machines support nested virtualization.
For my lab I need servers. I’ve decided to try and replicate what a business might have within their data centre. So I’ve built a lab that has the following servers:
- A Windows Active Directory Server
- A Windows File Server
- A Windows SQL Server
- A Windows Web front end server
- A Ubuntu server
The servers are a mix of Windows operating systems to give a feeling of realism and also a good testing ground across the various operating systems.
All these servers will be hosted inside an Azure VM.
Repeatable
As I said earlier it can be quite time consuming building this lab up so I’ve wrapped the lab up into a deployment script using Azure Resource Manager (ARM) template.
You can spin this lab up with a couple of clicks and then come back to it in a couple of hours and it’s in a usable state.
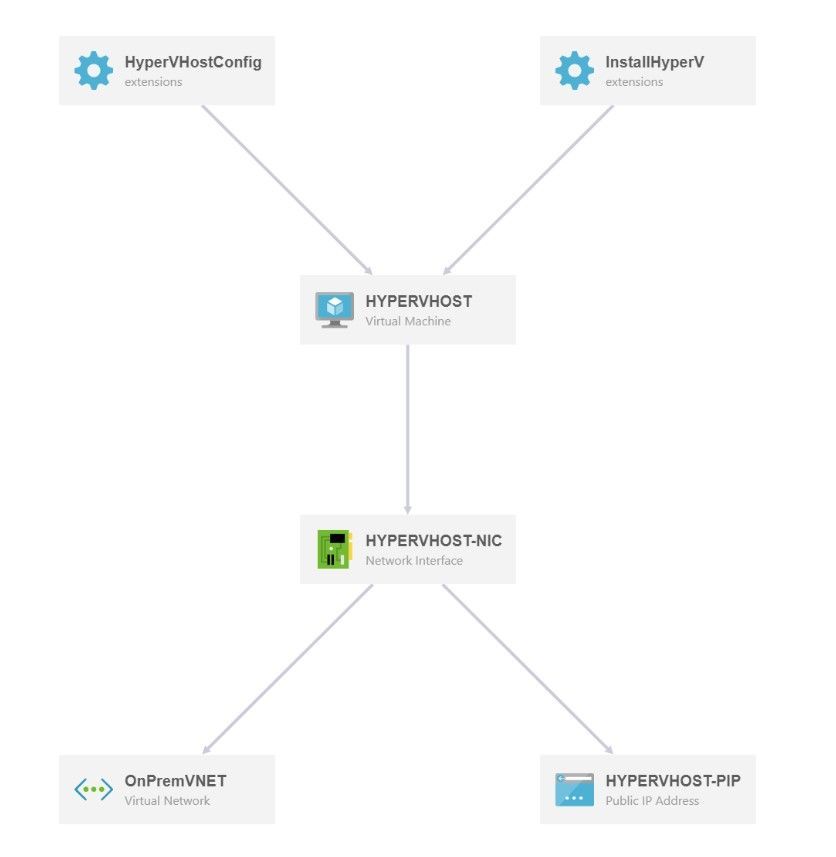
Let’s talk through what my ARM template does in more detail.
ARM Template
My ARM template does a few things:
- Deploys a Windows Server 2022 server
- Deploys a Virtual Network
- Deploys a network interface attached to my server
- Deploys a public IP address to my server and sets a DNS name for my server
- Installs the Hyper-V role on my server
- Fetches my pre-built VMs, and then deploys them within Hyper-V
Below is a visualisation of what the template does:
A copy of the ARM template can be found here.
The ARM template is 212 lines long so let’s try and break it down a little.
Variable declaration
At the start of this template there is a variables section that specifies the name of various items throughout the deployment.
  "variables": {
    "OnPremVNETPrefix": "10.0.0.0/16",
    "OnPremVNETSubnet1Name": "VMHOST",
    "OnPremVNETSubnet1Prefix": "10.0.0.0/24",
    "HyperVHostName": "HYPERVHOST",
    "HyperVHostImagePublisher": "MicrosoftWindowsServer",
    "HyperVHostImageOffer": "WindowsServer",
    "HyperVHostWindowsOSVersion": "2022-Datacenter",
    "HyperVHostOSDiskName": "[concat(variables('HyperVHostName'), '-OSDISK')]",
    "HyperVHostVmSize": "Standard_E4as_v4",
    "HyperVHostVnetID": "[resourceId('Microsoft.Network/virtualNetworks', 'OnPremVNET')]",
    "HyperVHostSubnetRef": "[concat(variables('HyperVHostVnetID'), '/subnets/', variables('OnPremVNETSubnet1Name'))]",
    "HyperVHostNicName": "[concat(variables('HyperVHostName'), '-NIC')]",
    "HyperVHost-PUBIPName": "[concat(variables('HyperVHostName'), '-PIP')]",
    "HyperVHostConfigArchiveFolder": ".",
    "HyperVHostConfigArchiveFileName": "HyperVHostConfig.zip",
    "HyperVHostConfigURL": "https://github.com/weeyin83/Lab-Deployment-in-Azure/blob/main/HyperVHostConfig.zip?raw=true",
    "HyperVHostInstallHyperVScriptFolder": ".",
    "HyperVHostInstallHyperVScriptFileName": "InstallHyperV.ps1",
    "HyperVHostInstallHyperVURL": "https://raw.githubusercontent.com/weeyin83/Lab-Deployment-in-Azure/main/InstallHyperV.ps1"
  },
In this section I've defined the Virtual Network and subnet, the name of my host machine, the operating system I want installed, the size of machine to be deployed and the names of elements such as the network interface (NIC) and Public IP.
The last three lines refer to the installation of Hyper-V and the deployment of my pre-built VMs.
Azure virtual machine deployment
Lines 35 to 145 are the standard deployment settings you'd see in any ARM template that deploys a virtual machine in Azure. It refers to how to set up the virtual network, subnet, public IP, the VM, etc.
Install Hyper-V
Lines 153 to 177 are where I have automated the installation of Hyper-V inside the Azure VM.
      "resources": [
        {
          "name": "InstallHyperV",
          "type": "extensions",
          "location": "[resourceGroup().location]",
          "apiVersion": "2017-12-01",
          "dependsOn": [
            "[resourceId('Microsoft.Compute/virtualMachines', variables('HyperVHostName'))]"
          ],
          "tags": {
            "displayName": "Install Hyper-V"
          },
          "properties": {
            "publisher": "Microsoft.Compute",
            "type": "CustomScriptExtension",
            "typeHandlerVersion": "1.4",
            "autoUpgradeMinorVersion": true,
            "settings": {
              "fileUris": [
                "[variables('HyperVHostInstallHyperVURL')]"
              ],
              "commandToExecute": "[concat('powershell -ExecutionPolicy Unrestricted -File ', variables('HyperVHostInstallHyperVScriptFolder'), '/', variables('HyperVHostInstallHyperVScriptFileName'))]"
            }
          }
        },
This section takes advantage of the Custom Script Extension that helps with post deployment configuration, software installation etc. It has the ability to download scripts and then execute them.
The Custom Script Extension can download a script from sources such as GitHub, Azure Storage, an internal file server, just ensure that if you are downloading from something like GitHub you have the necessary Internet access available through your Network Security Group, firewall, etc. Any scripts you call shouldn't require user input and they have up to 90minutes to run, anything longer than that and a failed state will be reported.
In my configuration my ARM template goes away and downloads the PowerShell script that instructs it toInstall Hyper-V and the management tools. You can see the variables (HyperVHostInstallHyperVScriptFileName, HyperVHostInstallHyperVURL and HyperVHostInstallHyperVScriptFolder) that were defined earlier being referenced in this section.
Deploy the pre-built VMs
Lines 178 to 211 look at deploying the pre-built VMs inside my Azure virtual machine. .
        {
          "name": "HyperVHostConfig",
          "type": "extensions",
          "location": "[resourceGroup().location]",
          "apiVersion": "2017-12-01",
          "dependsOn": [
            "[resourceId('Microsoft.Compute/virtualMachines', variables('HyperVHostName'))]",
            "[resourceId('Microsoft.Compute/virtualMachines/extensions', variables('HyperVHostName'), 'InstallHyperV')]"
          ],
          "tags": {
            "displayName": "HyperVHostConfig"
          },
          "properties": {
            "publisher": "Microsoft.Powershell",
            "type": "DSC",
            "typeHandlerVersion": "2.9",
            "autoUpgradeMinorVersion": true,
            "settings": {
              "configuration": {
                "url": "[concat(variables('HyperVHostConfigURL'))]",
                "script": "HyperVHostConfig.ps1",
                "function": "Main"
              },
              "configurationArguments": {
                "nodeName": "[variables('HyperVHostName')]"
              }
            }
          }
        }
      ]
    }
  ],
  "outputs": {}
}
This part of the template takes advantage of the Desired State Configuration (DSC) extension.
This is a standalone action for this template, it doesn't require any setup within DSC in Azure. The Azure DSC extension uses the Azure VM Agent to deliver this configuration.
In this instance it downloads the ZIP file that I have referenced in my variables then extracts the PowerShell(PS1) file that is within there and executes the commands in there.
Within this PS1 file is the configuration that downloads my pre-built VMs, sets up the networking for Hyper-V and then imports my VMs and starts them up in Hyper-V.
Hyper-V setup and VM deployment
The PowerShell script that is used to deploy the Hyper-V network and VMs inside my Azure VM looks like this:
<#
Microsoft Lab Environment - Azure Backup
.File Name
 - HyperVHostConfig.ps1

.What calls this script?
 -

.What does this script do?
 - Creates an Internal Switch in Hyper-V called "NatSwitch"

 - Downloads an images of several servers for the lab environment

 - Repartitions the OS disk to 400GB in size

 - Add a new IP address to the Internal Network for Hyper-V attached to the NATSwitch

 - Creates a NAT Network on 192.168.0.0/24

 - Creates the Virtual Machines in Hyper-V

 - Issues a Start Command for the new VMs
#>

Configuration Main
{
	Param ( [string] $nodeName )

	Import-DscResource -ModuleName 'PSDesiredStateConfiguration', 'xHyper-V'

	node $nodeName
  	{
		# Ensures a VM with default settings
        xVMSwitch InternalSwitch
        {
            Ensure         = 'Present'
            Name           = 'NatSwitch'
            Type           = 'Internal'
        }

		Script ConfigureHyperV
    	{
			GetScript =
			{
				@{Result = "ConfigureHyperV"}
			}

			TestScript =
			{
           		return $false
        	}

			SetScript =
			{
				$zipDownload = "https://hypervlabstorage.azureedge.net/azurelab/HyperVLabVMs.zip"
				$downloadedFile = "D:\HyperVLabVMs.zip"
				$vmFolder = "C:\VM"
				Resize-Partition -DiskNumber 0 -PartitionNumber 2 -Size (400GB)
				Invoke-WebRequest $zipDownload -OutFile $downloadedFile
				Add-Type -assembly "system.io.compression.filesystem"
				[io.compression.zipfile]::ExtractToDirectory($downloadedFile, $vmFolder)
				$NatSwitch = Get-NetAdapter -Name "vEthernet (NatSwitch)"
				New-NetIPAddress -IPAddress 192.168.0.1 -PrefixLength 24 -InterfaceAlias $NatSwitch.Name
				New-NetNat -Name NestedVMNATnetwork -InternalIPInterfaceAddressPrefix 192.168.0.0/24 -Verbose
				New-VM -Name AD01 `
					-MemoryStartupBytes 2GB `
					-BootDevice VHD `
					-VHDPath 'C:\VM\AD01.vhdx' `
                    -Path 'C:\VM' `
					-Generation 1 `
				    -Switch "NATSwitch"
				Start-VM -Name AD01
				New-VM -Name FS01 `
					-MemoryStartupBytes 2GB `
					-BootDevice VHD `
					-VHDPath 'C:\VM\FS01.vhdx' `
					-Path 'C:\VM' `
					-Generation 1 `
					-Switch "NATSwitch"
				New-VM -Name SQL01 `
					-MemoryStartupBytes 8GB `
					-BootDevice VHD `
					-VHDPath 'C:\VM\SQL01.vhdx' `
					-Path 'C:\VM' `
					-Generation 1 `
				-Switch "NATSwitch"
				Start-VM -Name FS01
				Start-VM -Name SQL01
				New-VM -Name WEB01 `
					-MemoryStartupBytes 2GB `
					-BootDevice VHD `
					-VHDPath 'C:\VM\WEB01.vhdx' `
					-Path 'C:\VM' `
					-Generation 1 `
					-Switch "NATSwitch"
				Start-VM -Name WEB01
				New-VM -Name WEB02 `
				    -MemoryStartupBytes 2GB `
				    -BootDevice VHD `
				    -VHDPath 'C:\VM\WEB02.vhdx' `
				    -Path 'C:\VM' `
				    -Generation 1 `
				    -Switch "NATSwitch"
				Start-VM -Name WEB02
			}
		}
  	}
}
The script does the following:
- Ensures there is a Virtual Switch, labelled Internal is configured within Hyper-V
- Sets the download location of my VMs and where they will go
- Resizes the OS disk on my Azure VM to 400GB
- Downloads my VMs (in ZIP file format)
- Extracts them from the ZIP file
- Sets up the Hyper-V NAT network
- Imports the Active Directory (AD01) VM
- Imports the File Server (FS01) VM
- Imports the SQL (SQL01) VM
- Imports the Windows Web (WEB01) VM
- Imports the Ubuntu Web (WEB02) VM
- And starts up those new VMs
After the deployment is complete I have a few checks to complete around the IP addressing of the VMs themselves but other than that the environment is ready to use.
Round Up
This deployment and lab aren’t perfect and there are alot of things that can be improved by it does save a lot of time and rework.
You can find my ARM template and PowerShell scripts on my GitHub at https://github.com/weeyin83/Lab-Deployment-in-Azure.
I'd welcome any feedback on what I've done. Please do reach out with any questions as well, happy to help!