Getting hands on with Azure Migrate
Getting started with Azure Migrate and evaluating your environment for a move to Azure.

I've been recently working a lot of Azure Migrate, and although I've spent alot of time over the years managing VMware environments I haven't been hands on with one for nearly two years now. So I dusted off my aging HP ProLiant Microserver and spun up a small VMware environment lab to get hands on with Azure Migrate.
Building my lab environment
Now my HP ProLiant Microserver is a little old, it's a N40L, Generation 8. However the plucky little Dual Core Processor model with 16GB of RAM has served me well. It has helped me create and lab a lot of scenarios over the years. I mostly used it when I was studying for my MCSE in Windows Server 2008 qualification. Although it's not the most powerful or latest server out there it is more than capable of running a small VMware lab for this purpose. Within my lab I am running VMware ESXi 5.5.0 Update 2 as the base with the Linux VMware vCenter Server 5.5 Update 2 to control the environment. Now I know this is not the latest version of ESXi, however this version runs solid on my N40L server and there are a lot of people out there still using this version in production, so it's still a valid version to be labbing on. So with the base of environment setup, I started to provision some servers within there so I would have some data to collect with Azure Migrate. I've spun up a Windows Server 2008 R2, a Windows Server 2012 and a Ubuntu server. I've picked those Operating Systems to get a bit of a "diverse" result set. As this is a test environment, in order to simulate some kind of load on the Windows Servers I have made use of the following tools:
- CPUStress Test tool from SysInternals
- TestLimit tool from SysInternals
On the Ubuntu machine I installed Stress and used that to simulate some load statistics. Obviously this isn't ideal or perfect but for this test environment and exercise it will give me some statistics that I use.
Creating my Azure Migrate Project
Now that I have my on premise environment built and running the next step is to create an Azure Migrate project within my Azure subscription.
- Log into the Azure Portal, click Create a Resource;
- Search for Azure Migrate and select;
- Now click on Create;
- Specify a project name, Azure subscription, location and resource group.
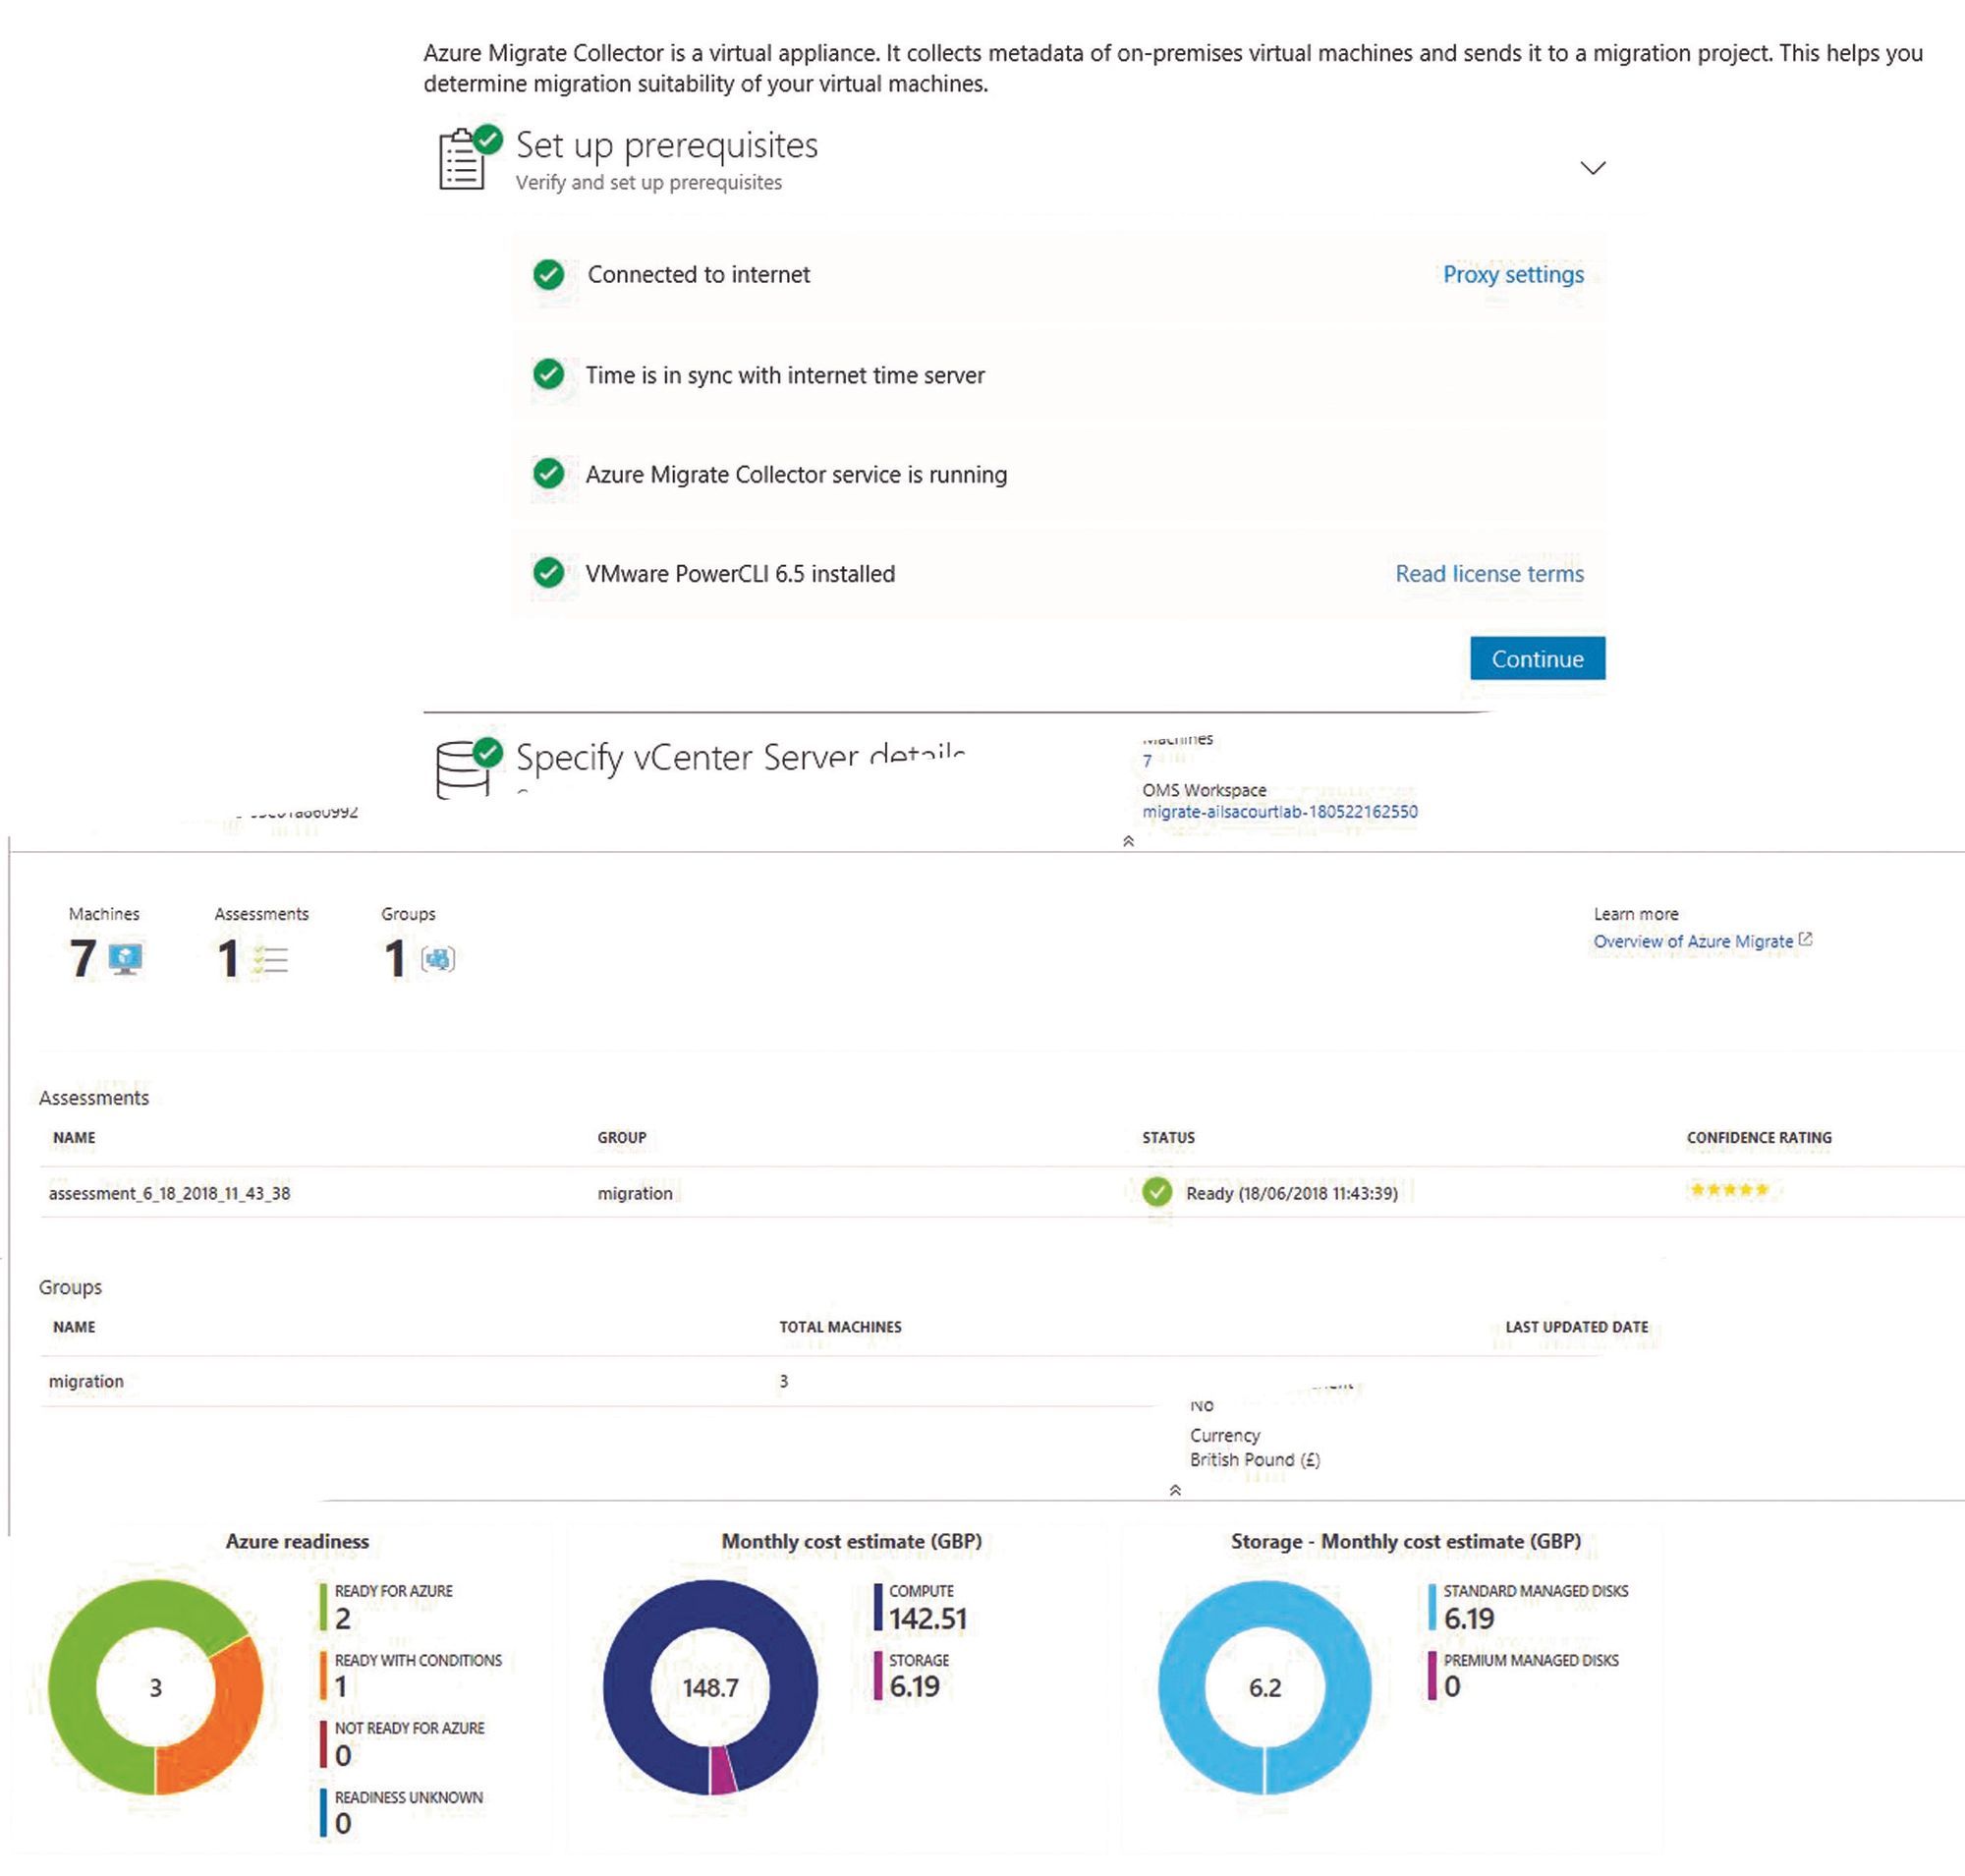
Azure Migrate needs an virtual machine (VM) within your VMware environment setup so that it can collect and send the metadata your environment back to Azure. The VM is available to download in an .OVA file. To download this file go into your Azure Migrate project - Click on Getting Started > Discover & Assess > Discover Machines;
- Click on Download;
- Once the file has been downloaded import this into your VMware environment using the "Deploy OVF template" wizard;
- When the VM has been deployed and is up and running. Go into your vSphere client console right click on the VM and Open Console;
- Provide the language, time zone and password for the appliance;
- Once the VM has loaded go to the desktop and click on the Run Collector shortcut;
- You will now be faced with a wizard of questions, work your way through them in relation to your environment till the collection starts.
To find out more information about the data that is collected by the Azure Migrate Application head over to the official documentation page - https://docs.microsoft.com/en-us/azure/migrate/concepts-collector#what-data-is-collected
Making sense of the data
Now that the data has been collected and is within your Azure Migrate project the next step is to start to make sense of the data collected and make it work for you. The first step I would recommend is creating a group for your machines. The log files may have picked up switched off or deleted machines and those will be listed within your discovery. You don't want to include machines that are no longer used within your cost analysis. You also want to exclude machines that aren't right for migration to Azure, such as your vCenter server or the Azure Migrate appliance. To create a group for assessment follow these steps;
- Log into the Azure Portal
- Locate your Azure Migrate project
- Click on "Groups" down the left hand side under Manage
- Click on the "Plus Group" icon
- Name your group and then select the servers that you want to include
- Click Create
Now that you have grouped the machines that you want to assess for Azure Migration the next step is to start the assessment. With the newly created group you will find a "Create Assessment" button, clicking on this will open a new blade. You can create an assessment using the default assessment properties but I recommend customising these for your own needs. To do this click on the "View All" link in the "New Assessment" blade. The assessment requires input from you in 12 areas. These are:
- Target Location: This is where you would be moving your workload to
- Storage Type: This allows you to specify if you want to use standard or premium managed disks for your environment, it's worth nothing that if you choose performance based sizing criterion then this option defaults to automatic.
- Sizing Criterion: This determines what Azure Migrate uses to recommend VM sizes. You can either choice to size based on your sizing from on premise or base your size recommendations on performance data. Personally I would choose performance based sizing and build in a comfort factor.
- Performance History: This is about how much data you would like Azure Migrate to use to make it's suggestions. My personal recommendation would be to use 1 month's worth of data.
- **Percentile **utilisation: If using performance as your sizing criterion this setting is to used to help
- VM Series: This is which VM sizes you wish Azure Migrate to use for it's recommendations. I would personally always recommend selecting all for this option.
- Pricing Tier: You have two choices here, Basic or Standard. I would always recommend Standard as it offers the most flexibility in configurations and features for your virtual machines.
- Comfort factor: This is any buffer that you want to add on top of the utilization data to account for extra things that the logs might not picked up, such as seasonal load.
- Pricing Offer: This is the pricing model that you are on with Azure, whether it be Pay As You Go or an Enterprise Agreement, or something else.
- Currency: This is the currency that you wish to see the cost analysis in.
- Discount: If you receive any discount in Azure pricing you should enter the percentage in here.
- Azure Hybrid Benefit: If you have Software Assurance for your licensing you can bring your Windows Server Licenses to Azure and make a saving.
Understanding the assessment
Once you have set your assessment criteria, Azure Migrate will process that and output the results. The report focuses on three main outcomes, Azure Readiness, Overall Monthly Cost Estimate and Storage Monthly Cost Estimate.

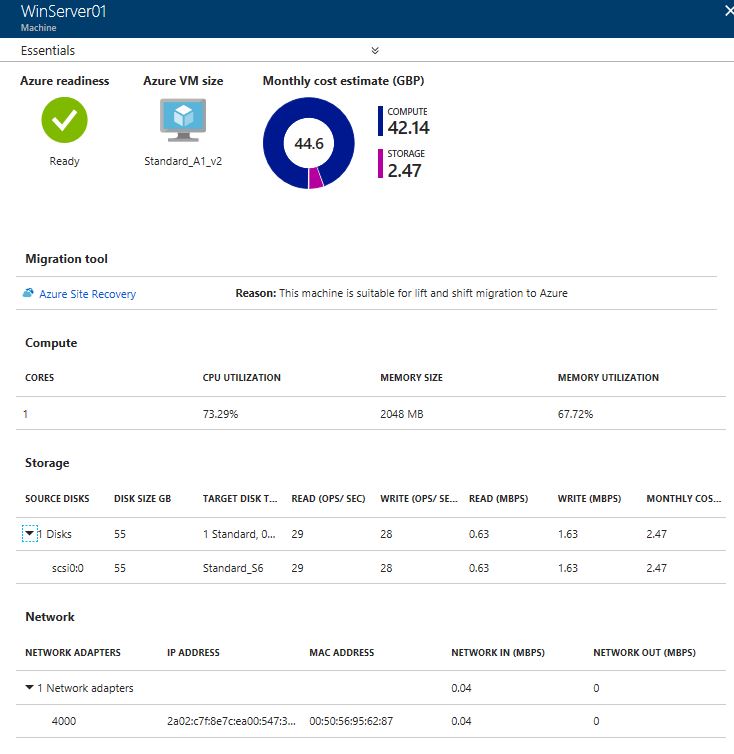
With the Azure Readiness section of the report you will find information regarding whether or not the Operating System is supported on Azure or not, Azure VM size, and suggested Azure Migration tool that can be used.
You can view all this information on one screen or if you want you can drill down into each VM to find out more about how and why Azure has recommended certain things. Things like disk read, and disk writes are broken down and you can see how that translates into Azure Monthly costs. Below is an example of the breakdown I received for one of my lab VMs.
Practical Advice
There are some things that you need to remember when you start to use Azure Migrate. The first is a positive, the product is FREE to use, you can use it for days, months, weeks, years and it won’t costs you anything. It’s a great place to start if you are trying to build a business case to present to your leadership about the readiness and costs associated with moving your work load to Azure.
The second point is at present the tool only supports evaluating VMware virtual environments, support for Hyper-V and physical servers is on the road map. There are some bulletin points to take note of when using the tool within your VMware environment, it must be managed by a vCenter server and be running versions 5.5, 6.0 or 6.5.
If you have a Hyper-V workload to migrate, I suggest looking at the Azure Site Recovery Deployment Planner!.
Each Azure Migrate project allows you to discover up to 1500 VMs in one discovery and up to 1500 VMs in one project. And similarly you can assess up to 1500 VMs at a time.
Azure Migrate is currently only supported in the West Central US and East US regions, this doesn’t impact where you migrate your workload to after the assessment has taken place though.
Overview
Azure Migrate is a great tool to make use of to evaluate your environment, understand the potential costs involved in migrating your workloads to Azure, understanding any migrations risks and the migration paths that are available to you.
As always if you want to discuss this in more detail please do reach out to me on Twitter at @TechieLass!