Gathering Feedback from Audiences
How I've used Azure components to deploy a feedback app

I've recently started to volunteer to speak at user groups and conference events in the UK and have four events lined up later this year. As I am new to public speaking and my talks are new I wanted to try to engage people to provide me with feedback so I could improve and find out if the talks I am delivering are actually covering what people are looking for. I stumbled across a fellow Microsoftie's GitHub project called "Smilr". Ben Coleman has designed a Microservices App that can be deployed on Azure and showcases microservices design patterns & deployment architectures. It can be deployed as a demo app to show people how things work or can be used in Production to gather feedback from audiences at Events, Hackathons, Labs, etc. Given that this app runs on Azure, would allow me to play with Docker, Azure Container Registries, Web Apps, Cosmos DB **AND **help me gather feedback from my audience in a simple way it was a no-brainer for me to have a look at. I'm a traditional Infrastructure bod, I know Windows Server, Hyper-V, VMware, Microsoft Exchange, Microsoft Office, SCOM, SCCM, Windows Operating Systems, etc like the back of my hand but I'm still trying to get a handle on Docker, Containers, Serverless etc. although it's a steep learning curve, I'm thoroughly enjoying playing with these technologies and seeing their possibilities. So while deploying the Smilr project I had a few stumbles along the way, and I want to document the process here to share with others and for myself, if I ever need to come back to it and make changes. :) There are multiple ways to play and deploy the Smilr app within Azure, but I choose the Azure Web App for Containers with Cosmos DB method as that would allow me to log the admin section of the application down using Azure AD.
Creating an Azure Container Registry
So the first step was to create an Azure Container Registry (ACR). In simplest of terms, ACR can help you store and manage your private Docker container images in a secure Azure environment. The price for using this service in Azure equates to pennies per day for the Basic or Standard plans, it's only when you start to deploy Premium ones that the price starts to go over £1 a day. In order to create my ACR for this project I launched Azure CLI, you can Launch the Azure Cloud Shell and run these commands as you read along if you wish -
 The first command I issued was:
az group create --name rg-speakingfeedback --location "East US"
This would create my resource group for the project resources and deploy it in the East US Azure Region. With my resource group created I can now start to deploy my ACR:
az acr create -n acrfeedback -g rg-speakingfeedback --admin-enabled --sku Standard
The above command creates an ACR called "acrfeedback" in a resource group called "rg-speakingfeedback" and deploys a Standard version of the ACR service.  Now that the ACR is deployed, you want to grab the username and password for use later on, to do that, issue the following two commands within your Cloud Shell window:
az acr credential show -n acrfeedback
Gives you the username The command below will give you the password:
az acr credential show -n acrfeedback --query passwords[0].value
Create Docker Images
The next step is to create your Docker images. The Docker compose YML file that Docker will use to build the Frontend and Data-API containers is provided for you. So assuming you have Docker installed either on your machine or access to another machine these are the steps you should take, please note my instructions are in reference to Docker being installed on an Ubuntu machine so if you are using a different platform your steps may differ:
- Download the Smilr project from GitHub - https://github.com/benc-uk/microservices-demoapp
1. I did this on my Ubuntu machine using the following steps:- Creating a Git directory to store the source files -
sudo mkdir Git - Change to that directory -
cd Git - Download the repository -
sudo git clone https://github.com/benc-uk/microservices-demoapp
- Creating a Git directory to store the source files -
- Now you have the project downloaded there are a few files you need to amend in order to tag your Docker images and deploy the application in a secure way (so only you can access the admin section of the app)
1. The first file you want to amend is the environment.prod.ts file -sudo nano Git/microservices-demoapp/angular/src/environments/environment.prod.tsChange the secured line from false to true, then save the file
2. Next, you want to create a file called .env -sudo nano Git/microservices-demoapp/.env. In this file you want to have: # Must have trailing slash DOCKER_REG=acrfeedback.azurecr.io/ # Must being with : DOCKER_TAG=:latest
- Once those changes are made you are now ready to create the Docker images. Make sure you are in the root of your project directory
cd Git/microservices-demoapp - Issue the command and Docker will start to build your two images, the Frontend and the Data-API:
sudo docker-compose build - Once the build process has completed you should be able to issue the command below to list the images available to you
sudo docker images ls - The next step is to push these images up to your ACR
1. Taking the username and password you collected for your ACR earlier issue the command below, it will prompt for the password. Once authentication you can now start to push images from your machine to the ACR.sudo docker login acrfeedback.azurecr.io -u acrfeedback
2. To push your images to the ACR issue the command below:sudo docker-compose pushYou should now see Docker connect to your ACR and start to push the images up. This should only take a few minutes.
Deploy the Solution
Now that you have your ACR populated with your container images it time to start to deploy the Web Apps and Cosmos DB to complete the jigsaw piece and make the application work.
Ben has created Azure deployment templates that you can use which allows a quick and easy way of deploying the Azure resources that you need, you can find the templates at – https://github.com/benc-uk/microservices-demoapp/blob/master/azure/templates. For this example, I am going to use the Azure Web App for Containers with Cosmos DB template. This template will make use of the Container Registry that we created above, deploy a front-end Web App, an API Web App, an App Plan and a Cosmos DB instance.
- Deploying a template to Azure is fairly straightforward, using this template I am asked to fill in information about certain things before it can deploy:
- Which Resource Group and Subscription to deploy the resources to
- What the front-end app should be called
- What the API app should be called
- The ACR name
- The ACR Password
- The App Plan size
- It took just over 3 minutes for the resources to deploy and be available.
Ben has developed this app so that it can be deployed just as a demo environment and anyone can access it or the admin panel but as I mentioned earlier I want to deploy a secure version so I only have access to the admin panel. To ensure this there are some settings that need to be configured within the front-end web app now it is deployed.
- Click on your front-end app service
- Click on the Authentication/Authorization blade
- Set the App Service Authentication to On
- Within the “Action to take when the request is not authenticated” box leave it at Allow Anonymous requests (no action)
- Next click on Azure Active Directory
- Select Express as the Management Mode
- Select New Azure AD App and give it an appropriate name and Save
The feedback app is now secured that only people within your Azure Active Directory (AD) can access the admin panel. I wanted to go one step further and only allow people I allowed access to the admin panel, to do this I tweaked a setting within the Azure AD permissions.
Now if someone tries to access the admin panel of the app and are not assigned permissions to it they will receive an error. Remember to assign yourself permissions to the app or you won’t be able to control it!
Gather Feedback
Now the app is deployed and secured you need to add your events so that people can provide feedback. Within the App, you can create feedback sessions for Events, Hacks, Workshops and Labs. Settings a date for each of your sessions will ensure that feedback is only opened on the day of the session, which should eliminate getting feedback from people not at the session.
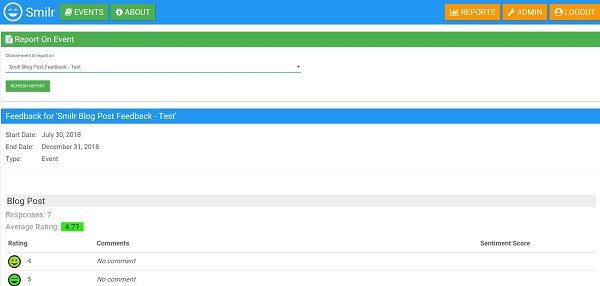
Within the backend, there is also a report section where you can find the feedback left by people and view any comments. I haven’t used the feedback app in full production yet but from my tests, the reports that it generates are very easy to understand and give you a good understanding of how people felt.
I’ve created a test feedback session for this blog post if you want to try it out – https://sarahfeedback.azurewebsites.net/feedback/FtEJk/2
What does the app look like?
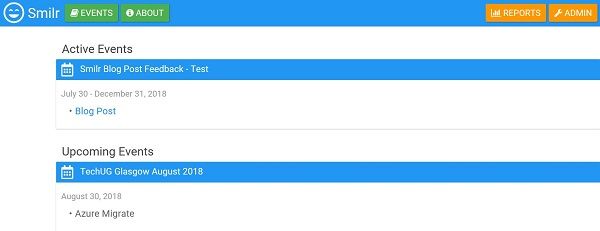
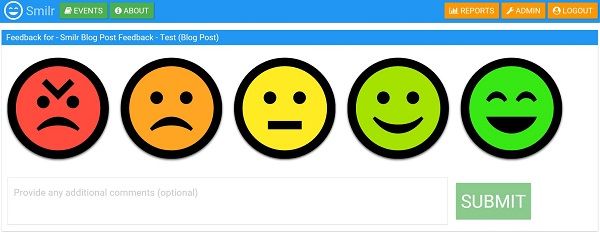
For those interested in having a look a the app once deployed here are some screenshots:
The landing page of the app:
The feedback screen the user is presented with:
The backend report that the admin of the app has access to:
Overview
I’ve only been running this solution for a few days so I don’t have a “real life” indication of what this solution costs per month, but from using the Azure Calculator, I estimate the solution will cost about £100 a month. I think I might be able to reduce that overtime once I understand how the app performs within real world examples but I will see how it runs and feedback and make any tweaks as necessary.
As always if you’d like to reach out and speak to me about any of the above please get in touch via Twitter @TechieLass