Enable External Email Warning Tag in Exchange Online
Learn how to enable the external warning tag within Outlook and help your users to identify malicious emails.

In a digital landscape rife with phishing threats, safeguarding your organization against external email risks is paramount. One effective strategy?
Implementing an external email warning or tagging system through Exchange Online. By taking this proactive step, you can empower users to swiftly identify and mitigate potential threats lurking in their inboxes.
Learn how to fortify your email defences with our guide to enabling the External Email Warning Tag feature in Exchange Online.
Enable an external sender warning
There are two options to enable and implement an external sender warning. I would personally recommend enabling both possibilities.
The first option is to enable the external email tag in Exchange Online. This will allow a built-in warning between the subject and body of the email when the email is from someone outside your organisation.
The second option is a custom warning banner at the top of the email. This allows you to show a custom warning based on words in the subject or body. Enabling this feature means you can flag emails asking the recipient to "update your password" or similar.
Supported clients of the External Email Tag
The external tag feature is a new one; it is visible and supported by the following versions of Outlook:
- Outlook Online
- Outlook for Window – rollout started May 2021
- Outlook for Mac – Version 16.47 and higher
- Outlook Mobile App – iOS and Android – version 4.2111.0 and higher
Enable External Email Tag
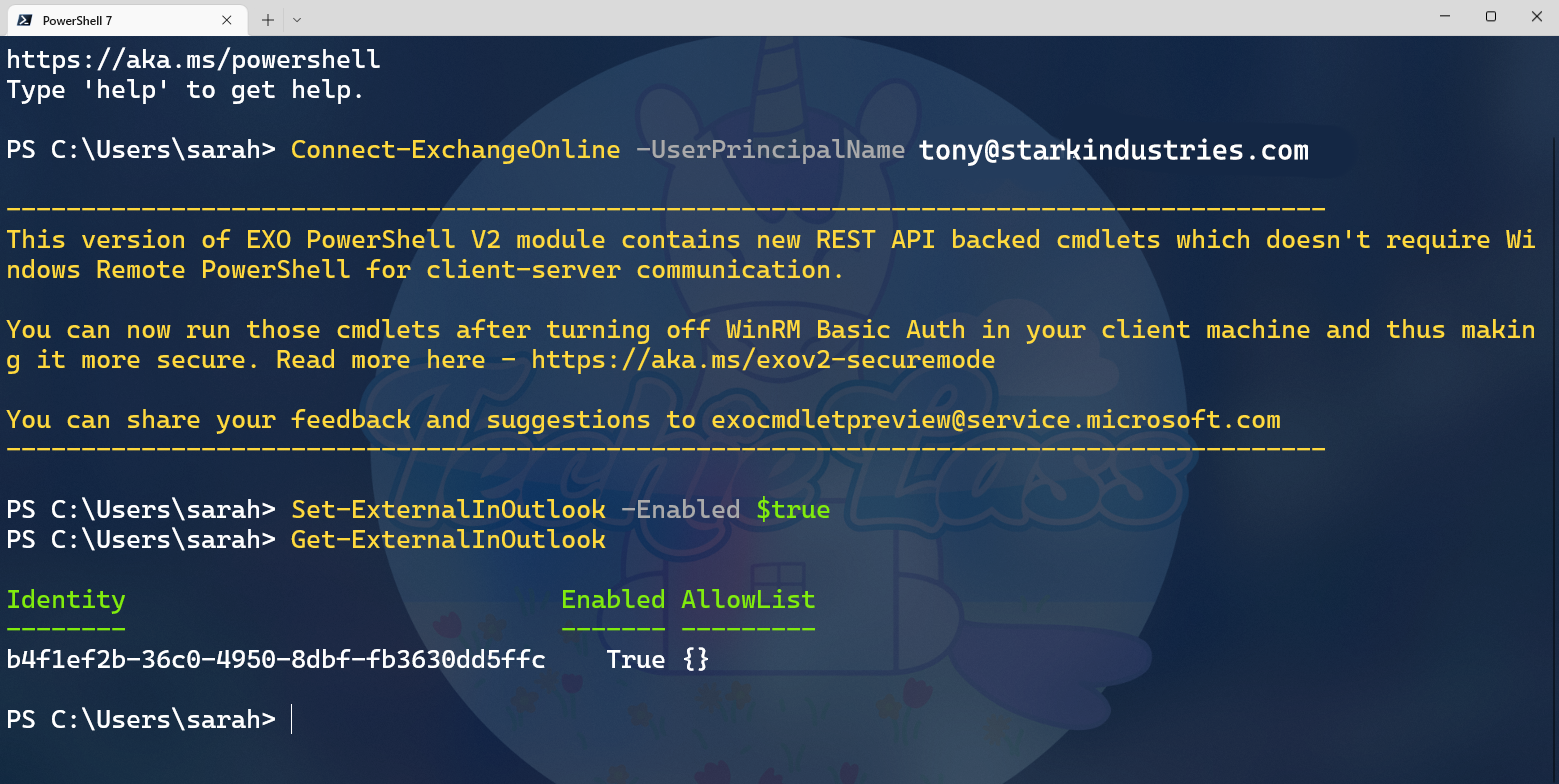
The first step is to connect to Exchange Online. You will need the Exchange Online PowerShell modules installed - if you don't have them installed, check out my blog post to do that.
Connect-ExchangeOnline -userPrincipalName tony@starkindustries.com
The next step is to enable the external tagging feature in Exchange Online; the following PowerShell command will action that:
Set-ExternalInOutlook -Enabled $true
To verify the settings, you can use the following PowerShell command:
Get-ExternalInOutlook
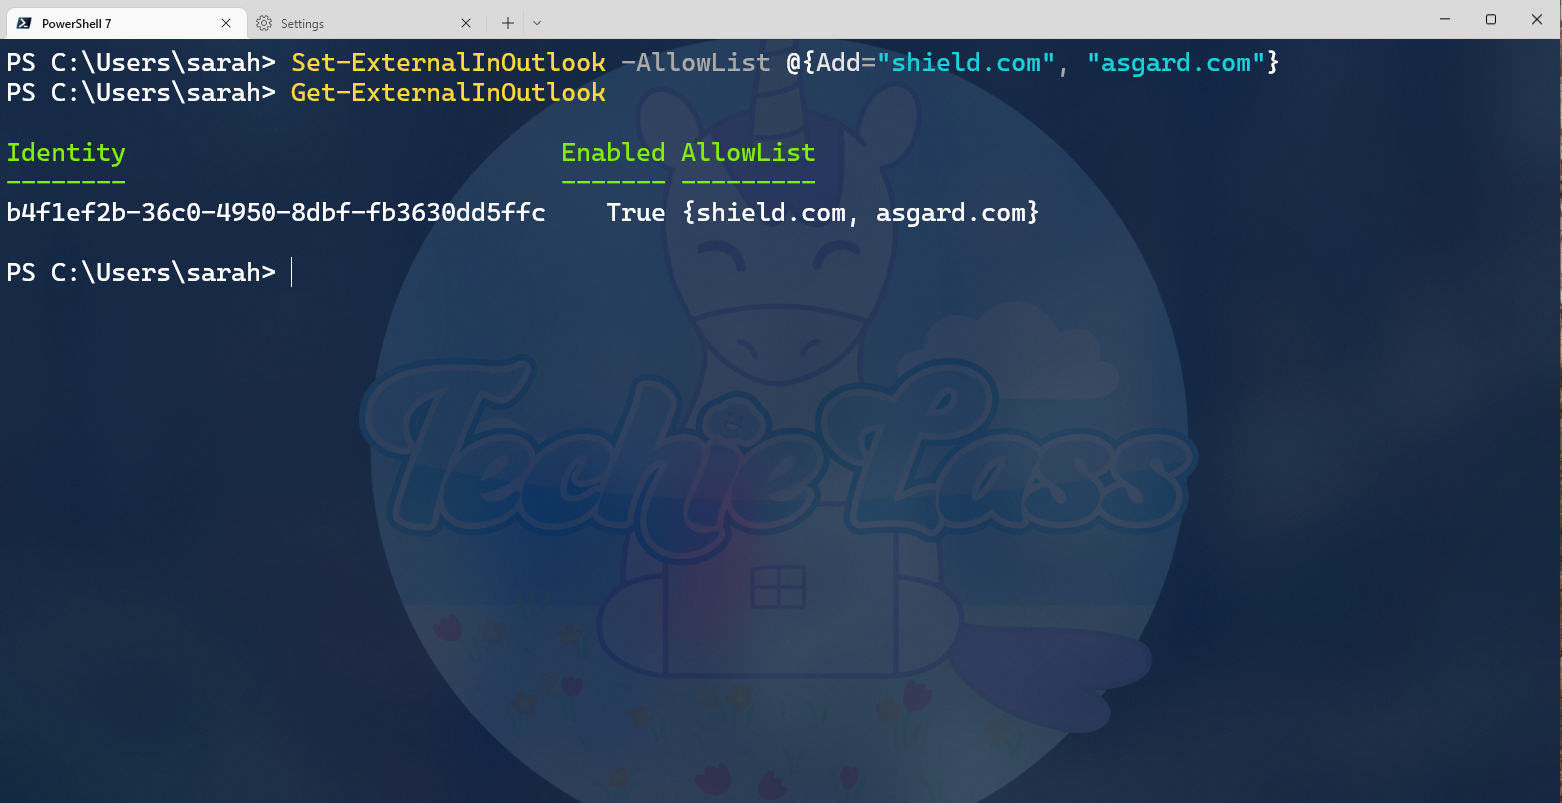
Exclude domains from the external tag
It is possible to exclude emails from certain domains being marked as external, this might be useful if you work closely with other organisations or you have multiple 365 tenants.
To add domains to the exclude list you can use the following PowerShell command:
Set-ExternalInOutlook -AllowList @{Add="shield.com", "asgard.com"}
If you need to amend the list of excluded domains you can use:
Set-ExternalInOutlook -AllowList @{Remove="maximoff.com", "wandavision.com"}
Create External Email Warning
You can create a custom message at the top or bottom of emails. The external tag is a great way to help people understand, potential malicious emails, but going a step further and adding a warning at the top of the emails can be an extra measure.
I would recommend setting up a custom warning based on the subject or body when the email suggests a password reset or change. To set up this warning message we are going to use the Office 365 Exchange Online Admin Center.
- Open the Microsoft 365 Admin center
- Login to the Exchange Admin Center
- Expand the Mail flow menu
- Select Rules
- Click on the plus and pick Create a new Rule
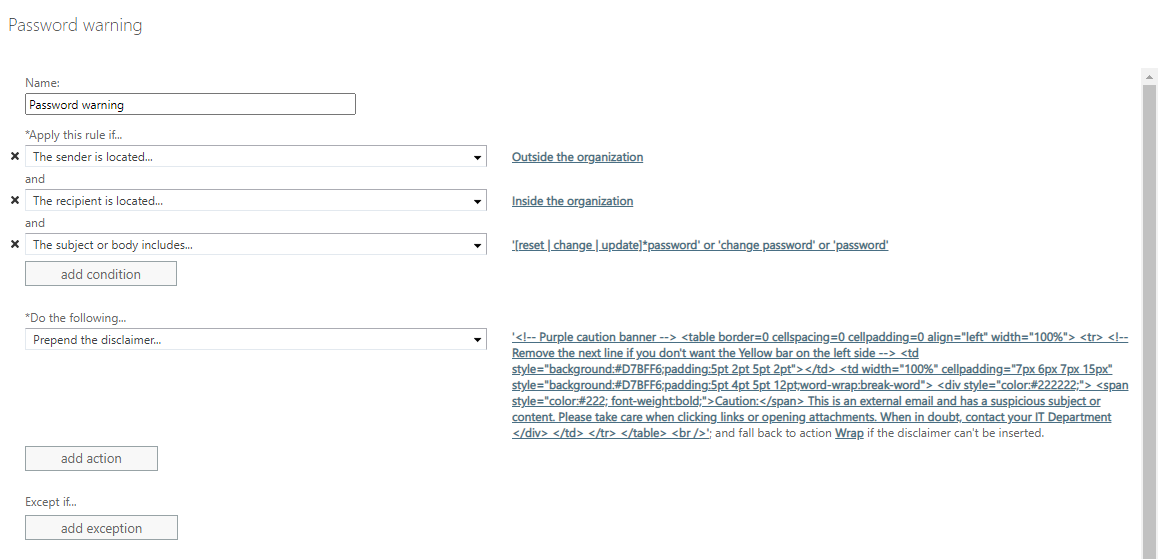
- Give the rule an appropriate Name
- Click on Apply this rule if
- Choose The sender is located…
- Select Outside the organization
- Next click More Options, you need this to be able to add in additional conditions to the rule
- Click on Add Condition under Apply this rule if
- Choose The recipient is located...
- Select Inside
- Now click on Add Condition under Apply this rule if
- Choose The subject or body matches…
- Select Subject or body matches these text patterns
In this warning example we want to highlight emails that are asking the recipient to change their password. So we are going to use text patterns like:
- [reset|change|update].*password
- Password access
You could add extra or change the text patterns that trigger this alert.
Now we've set up the rule triggering conditions, it's time to create the message that will be prepended to the start of the email.
- Click on Do the following
- Now choose Apply a disclaimer to the message
- Select Prepend the disclaimer…
- Click on Enter text…
- Paste the HTML code (amending as you need)
<table border=0 cellspacing=0 cellpadding=0 align="left" width="100%">
  <tr>
    <td width="100%" cellpadding="7px 6px 7px 15px" style="background:#ebab34;padding:5pt 4pt 5pt 12pt;word-wrap:break-word">
      <div style="color:#222222;">
        <span style="color:#222; font-weight:bold;">Caution:</span>
        This is an external email and is mentioning a password change or reset.  Please take care when actioning anything within this email. If you are in doubt please contact the IT Department.
      </div>
    </td>
  </tr>
</table>
<br/>
- Click on Select one.. and set the fall-back action to Wrap
- You have the option to include exceptions when this doesn't trigger. You may want to exclude this from triggering when your applications send password request messages. Any exceptions can be set under Except if.
With the rule completed, you can save it to enable it.
Recap
Enabling the external tag on emails is very useful for the recipient to help identify any malicious or suspicious emails.
With the warning message, I'd recommend using it sparingly and for specific examples. Having it turned on for every external email isn't ideal and will be something email users will get used to and start to ignore.
Enjoy using these two features to help your end users stay secure and vigilant against malicious emails.