Dev Containers in VS Code: Why every project needs one
Stop losing days to "works on my machine." Here's how dev containers standardise Terraform, Azure CLI, and tooling across your whole team.

If you're an infrastructure engineer, you've probably lived this scenario more than once: you clone a repo, try to run it, and immediately hit a wall. Wrong version of Terraform. Missing Azure CLI extension. Python 3.9 installed when the project needs 3.11. Someone on the team has a slightly different kubectl version and their manifests apply differently to yours.
Or even if you are running the repo on a new or different laptop and don’t have all the bits installed you need, so a simple quick change you logged on to do becomes a chore.
None of this is really about the code. It's about the environment around the code, and that's exactly what dev containers are built to fix.
What is a dev container?
A dev container is a fully defined, containerised development environment that VS Code can open a project inside of.
Instead of installing tools directly on your laptop, you define everything the project needs, runtime versions, CLI tools, extensions, environment variables, in a couple of config files that live in the repo itself. VS Code then builds a Docker container from that definition and effectively "moves in" to it, so your terminal, debugger, and extensions are all running inside the container rather than on your host machine.
The setup lives in a .devcontainer folder at the root of your project, usually containing:
- devcontainer.json — the main config file. It points to a base image or Dockerfile, lists which VS Code extensions should be installed, sets environment variables, forwards ports, and can run setup commands after the container builds.
- Dockerfile (optional) — if you need something more custom than an off-the-shelf base image.
- docker-compose.yml (optional) — useful if your dev environment needs multiple services, like a database alongside your app.
Here's a stripped-down example for an infrastructure repo that uses Terraform and the Azure CLI:
{
  "name": "azure-infra-dev",
  "image": "mcr.microsoft.com/devcontainers/base:ubuntu",
  "features": {
    "ghcr.io/devcontainers/features/terraform:1": {},
    "ghcr.io/devcontainers/features/azure-cli:1": {}
  },
  "customizations": {
    "vscode": {
      "extensions": [
        "hashicorp.terraform",
        "ms-azuretools.vscode-azurecli"
      ]
    }
  },
  "postCreateCommand": "terraform --version && az --version"
}
Now anyone that opens and uses this repo within VS Code and clicks "Reopen in Container" gets the exact same Terraform version, the same Azure CLI, and the same extensions, without touching their host machine and having to install software on it.
Why this matters for infrastructure engineers specifically
Dev containers get talked about a lot in application development circles, but they're arguably even more valuable for infra work, for a few reasons.
You're often juggling multiple tool versions across projects. One client or project is on Terraform 1.5, another has moved to 1.8. One uses an older Ansible collection, another's on the latest. Managing that with tfenv, pyenv, and a pile of shell aliases works, but it's fragile and it's personal to your machine, the next engineer who picks up the project has to rebuild all of that context themselves.
"Works on my machine" is a bigger deal in infra than people admit. If a Terraform plan behaves differently because of a provider version mismatch, or a script fails because someone's Python has a package installed that isn't in requirements.txt, that's not just annoying, it can mean a change gets applied to production infrastructure with different tooling than what was tested. Dev containers remove that variable entirely.
Onboarding shrinks from days to minutes. New engineer joins the team, clones the repo, opens it in VS Code, container builds, they're working. No wiki page titled "Setup Instructions (probably out of date)". No Slack thread asking why az login isn't working. The environment is the documentation.
It plays nicely with how infra work actually gets tested. You can bake in things like pre-commit hooks, tflint, checkov, or terrascan directly into the container so every engineer is running the same checks before a PR goes up, not just whoever remembered to install them locally.
Your host machine stays clean. No more global installs of ten different CLI tools that only one project actually needs, and no risk of one project's tooling silently breaking another's.
Your Azure credentials stay isolated too. This one's easy to overlook until it saves you. The container has its own filesystem, so az login inside it writes to its own token cache, completely separate from the Azure CLI session on your laptop. If you're juggling a client tenant in the container and your own internal tenant on your host, or you regularly switch between customer subscriptions, you're not stuck doing az account set back and forth or risking a script accidentally running against the wrong subscription because your host session was still authenticated to something else. Close the container, the session's gone. Nothing lingers, nothing carries over, and you never have to think about whether your laptop's ~/.azure folder is in the right state before you start work.
Why every project should have one
The honest answer: because the alternative is that the "setup" for your project lives in someone's head, a README that drifts out of date, or a Confluence page nobody updates. A .devcontainer folder is executable documentation, it can't go stale in the same way, because if it's wrong, the container simply fails to build and someone fixes it.
It also removes a surprising amount of friction around collaboration between teams. If a security engineer needs to review your Terraform, or a colleague from another team needs to pick up an issue while you're on leave, they don't need a briefing on your local setup. They open the repo, reopen in container, and they're in the same environment you'd be in.
Another reason devcontainers are worth having in every project: if your code lives in a GitHub repo, GitHub can read that same devcontainer config and spin up a matching Codespace for you. That means you can make changes straight from your browser, on a remote host, without touching your local machine at all.
Things worth knowing before you roll this out
To be fair to the reality of this, dev containers aren't completely free:
- First build can be slow. Pulling base images and installing features takes a few minutes the first time. Subsequent starts are much faster thanks to caching, but it's worth setting expectations.
- Resource overhead. Running your entire dev environment in a container adds some CPU/RAM overhead compared to running tools natively, which matters more on lower-spec machines.
- Not a replacement for CI parity. A dev container makes your local environment consistent with your teammates', but you still want your CI pipeline using the same (or compatible) images so there's no gap between "works in my dev container" and "works in the pipeline."
None of these are reasons to avoid dev containers, they're just things to plan for, the same way you'd plan for any new piece of standard tooling.
Getting started
If you want to try this on an existing project:
- Install the Dev Containers extension in VS Code.
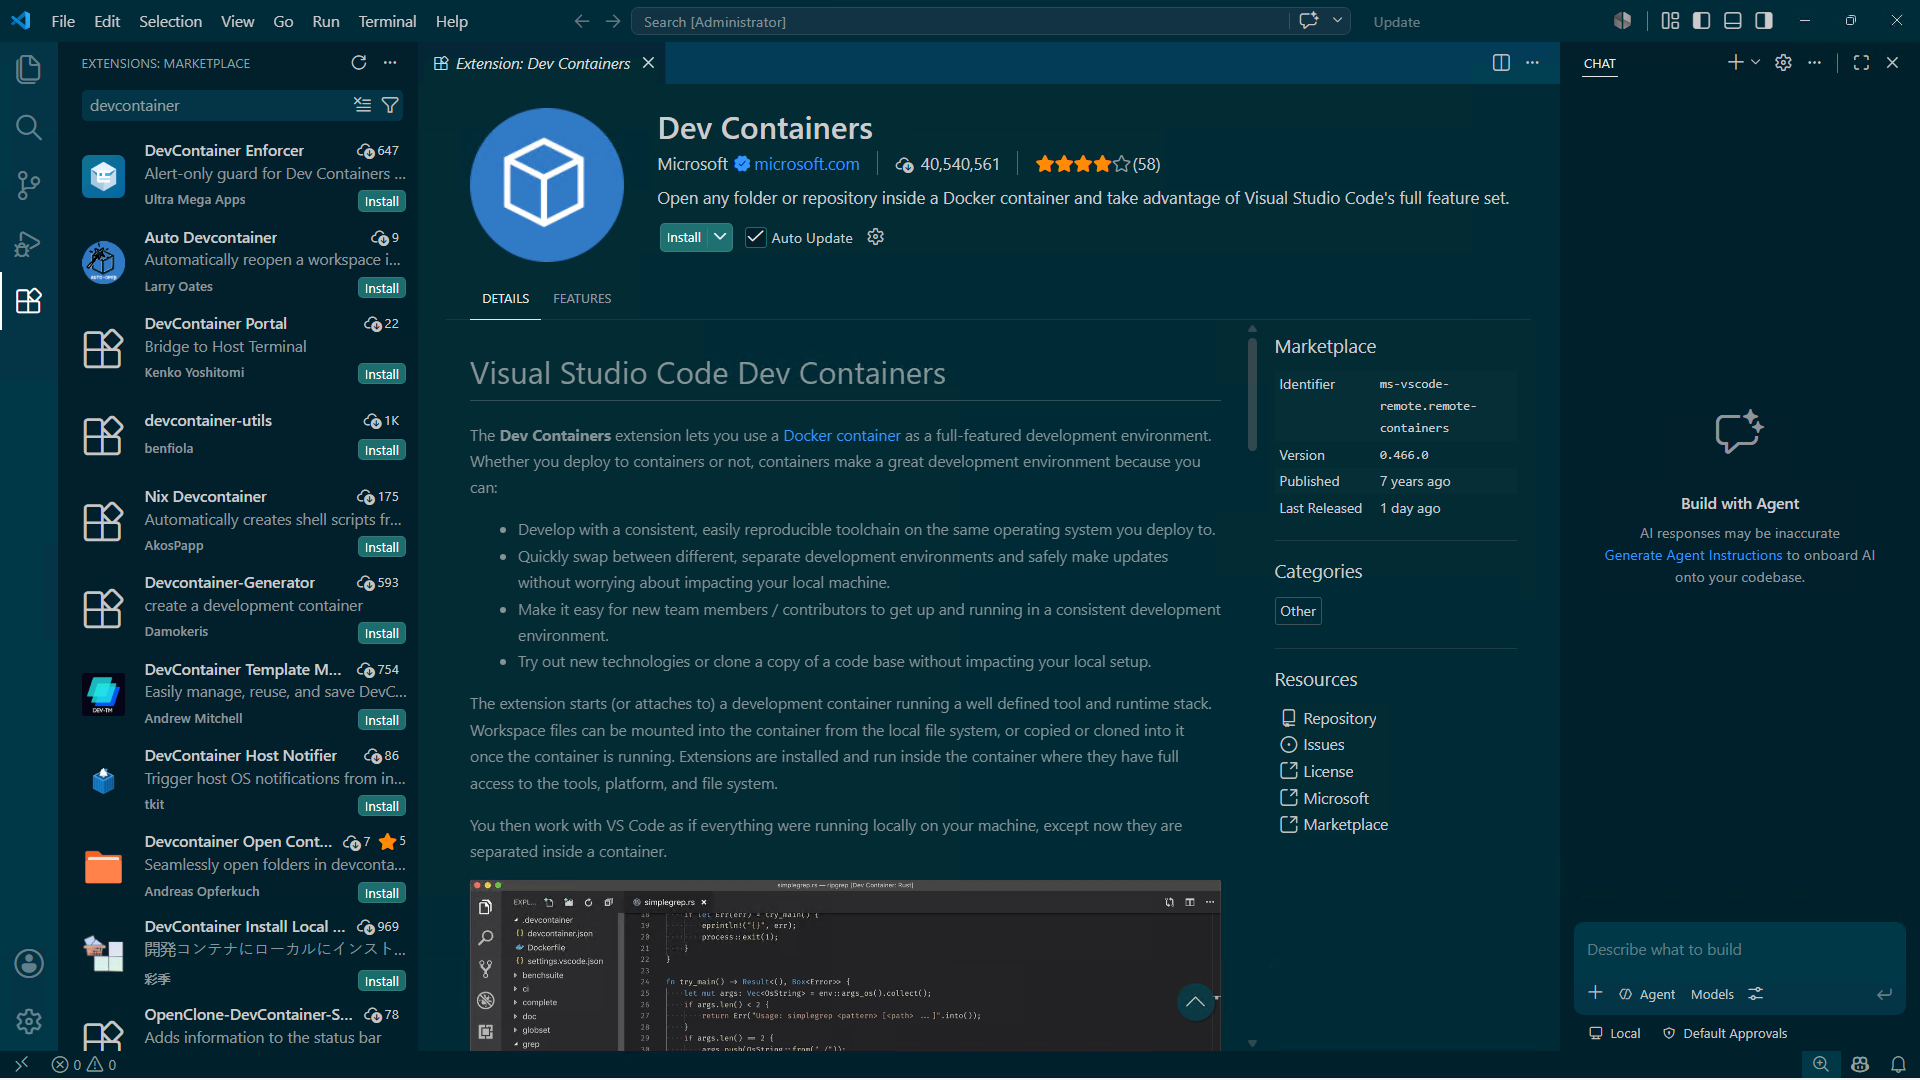
- Add a .devcontainer/devcontainer.json file to your repo, you can start with one from the official templates if your stack is common (Terraform, Python, Node, etc.). To do this open the Command Palette → Dev Containers: New Dev Container → Terraform → Select an option from the list → Create Dev Container
- It will ask you to install Docker in WSL if you haven’t already done so, it will then ask you to restart the machine to complete the installation.
- When the computer has restarted, launch VS Code, open the repo and select Command Palette → Dev Containers: Rebuild and Reopen in Container
- Once it's built, check that your usual commands (terraform version, az --version, whatever your project needs) come back clean.
- Commit the .devcontainer folder so the rest of the team can use it also.
Let Copilot write your Dev Container
You don't have to build a devcontainer.json from scratch every time. If you've got GitHub Copilot (or another AI assistant) wired into your editor, it can generate a solid first pass based on what's actually in your repo, then you tidy up the details.
Something like this works well as a starting prompt:
You are an expert DevOps engineer, software architect, and GitHub Codespaces specialist.

Your task is to analyse this entire repository and create the most appropriate, secure, performant, and maintainable Dev Container configuration for the project.

Instructions:

1. Repository Analysis
- Scan the entire repository structure.
- Identify all languages, frameworks, runtimes, SDKs, build tools, package managers, databases, infrastructure components, test frameworks, and developer tooling.
- Examine configuration files such as:
- package.json
- requirements.txt
- pyproject.toml
- pom.xml
- build.gradle
- *.csproj
- global.json
- Dockerfiles
- docker-compose files
- Makefiles
- scripts
- CI/CD workflows
- GitHub Actions
- README documentation
- environment configuration files

2. Determine Developer Requirements
- Identify what developers need to build, run, debug, test, lint, and deploy the application.
- Detect local services required by the application.
- Identify common developer workflows.
- Consider onboarding experience for new contributors.

3. Design an Optimised Dev Container
- Create a complete .devcontainer configuration.
- Use the smallest practical base image.
- Optimise for startup speed, build speed, and developer productivity.
- Follow Microsoft and GitHub Codespaces best practices.
- Use the latest stable versions unless the repository explicitly requires specific versions.
- Apply security best practices and least-privilege principles.

4. Recommend Supporting Components
- Determine whether the project should use:
- devcontainer.json
- Dockerfile
- docker-compose.yml
- Features
- Custom scripts
- Post-create commands
- Post-start commands
- VS Code settings
- VS Code extensions

5. Produce Deliverables

First provide:
- Executive summary of findings.
- Technologies detected.
- Assumptions made.
- Risks or gaps discovered.

Then provide:
- Complete folder structure.
- Full contents of every generated file.
- Explanation of why each choice was made.

6. Validation
- Verify the configuration supports building, debugging, testing, and running the application.
- Highlight anything that cannot be determined automatically.
- Suggest optional improvements.

7. Optimisation Pass
- Review your own solution.
- Identify opportunities to simplify, secure, or speed up the dev container.
- Produce a final recommended version after optimisation.

Important:
- Do not make assumptions without stating them.
- Prefer repository evidence over defaults.
- If multiple valid approaches exist, compare them and recommend the best option.
- Generate production-quality output that can be committed directly to source control.
Takeaway
Dev containers won't fix bad infrastructure code, but they'll fix a huge chunk of the friction around working on infrastructure code as a team. If you've ever lost half a day to environment drift, or watched a new starter spend their first two days just getting their laptop set up, it's worth taking the time to create a dev container for your next project. And if you have access to AI assistant tools such as GitHub Copilot, you can ask it to look at your repo and create an appropriate dev container configuration file. Once it's there, "clone and go" stops being aspirational and starts being how the team actually works.