Automating Azure VM with Chef
Start your Chef journey by deploying a virtual machine to Azure in this step by step guide.


Over the last few weeks I've been teaching myself Chef through the Learn Chef Rally learning site and then been delving into what I can do with Chef and Azure.
So working with some old documentation and piecing together parts that I learned I've got a step by step guide on how I can use Chef to deploy Azure VMs. Now it's not a perfect deployment but I really like the possibilities it has and it's a great starting point for someone look to learn Chef.
Let's get started.
Set up your workstation
To deploy resources with Chef you need certain software installed. While I was learning I set up a Windows 10 virtual machine (VM) and installed the necessary software there. This meant that as I learnt and figured out different bits and bobs, this meant if I did some wrong I wasn't trashing my own machine and could just scrap it and start again.
So grab your Windows 10 build (I was using 1803) and carry out the following:
- Install Visual Studio Code
- Install Azure CLI
- Install Chef Workstation
For those that are familiar with Chocolatey, I've written a small script that installs the above. You just need to copy and paste the below script into an elevated PowerShell window and the three pieces of software will get installed.
##Install Chocolately
Set-ExecutionPolicy Bypass -Scope Process -Force
Invoke-Expression ((New-Object System.Net.WebClient).DownloadString('https://chocolatey.org/install.ps1'))

##Define the software to be installed
$Packages = 	'vscode',`
	    	'azure-cli',`
		'chef-workstation'

##Install the defined software
ForEach ($PackageName in $Packages)
{choco install $PackageName -y}

##Reboot
Restart-Computer
Set up Chef Server
For those just starting out with Chef, the Chef Server component is that part that stores your cookbooks, the policies applied to nodes (machines) and information about those nodes. On each of your nodes the Chef Client will be installed on them and that client will communicate with the Chef Server for configuration details.
There are two options available to you for a Chef Server, you can use a hosted server or deploy a standalone one. In this blog post I am going to use a host server.
- Sign up for a free Hosted Chef trial, which is the fastest way to get started with Chef.
- Install a standalone Chef Server on linux-based machine, following the installation instructions from Chef Docs.
Once your server or hosted server is setup go into the Administration tab and you will see a "Download Starter Kit" button, click on that. This download will contain configuration data that will be needed for you to communicate with your Chef server.
The other thing you need is your validation key. To download this down the left hand side you should see a "Reset Validation Key" button, if you click on this you will get a warning saying your keys are going to be reset, don't worry as this is the first time you are using the Chef Server you won't cause any issues.
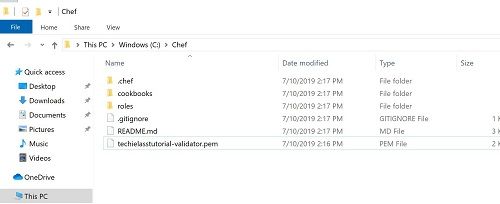
Create a directory called C:\Chef and store your validation key into it.
Extract the content of the chef-starter.zip to the C:\Chef directory. The files might have extracted into C:\Chef\chef-starter move all those files directly into C:\Chef directory.
Your Chef directory should look like this:
Configure Azure Service Principal
In simplest of terms an Azure Service Principal is a service account.
We will be using a Service Principal to help us create Azure resources from our Chef Workstation. The Service Principal will have the relevant permissions within Azure to create the resources within our subscription.
To create the relevant Service Principal with the required permissions we need to run the following commands within PowerShell, you can use the Azure Shell:
Login-AzureRmAccount
Get-AzureRmSubscription
Select-AzureRmSubscription -SubscriptionName "<yourSubscriptionName>"
$myApplication = New-AzureRmADApplication -DisplayName "automation-app" -HomePage "https://replacewithyourownfictious.com" -IdentifierUris "https://replacewithyourownfictious.com" -Password "#1234p$wdchef19"
New-AzureRmADServicePrincipal -ApplicationId $myApplication.ApplicationId
New-AzureRmRoleAssignment -RoleDefinitionName Contributor -ServicePrincipalName $myApplication.ApplicationId
Please take a note of the following information:
- SubscriptionID
- TenantID
- ClientID
- Client Secret (aka the password you set above)
We will be using this information on your workstation.
Set up your workstation (part 2)
Now we need to take some information from your Chef server and the Azure Service Principal and store it in your workstation so it can be used during your Chef deployment call.
Within your C:\Chef.chef folder you will find a file called knife.rb, this contains your Chef Knife configuration. We need to edit this file and add in some additional configuration. If you open the .rb file within Visual Studio Code you should get a good editing experience.
We need to edit the knife.rb file so it looks like this:
current_dir = File.dirname(__FILE__)
log_level                :info
log_location             STDOUT
node_name                "myorg"
client_key               "#{current_dir}/myorg.pem"
validation_client_name   "myorg-validator"
validation_key           "#{current_dir}/myorg-validator.pem"
chef_server_url          "https://api.chef.io/organizations/myorg"
cookbook_path            ["#{current_dir}/../cookbooks"]
knife[:azure_tenant_id] = "0000000-1111-aaaa-bbbb-222222222222"
knife[:azure_subscription_id] = "11111111-bbbbb-cccc-1111-222222222222"
knife[:azure_client_id] = "11111111-bbbbb-cccc-1111-2222222222222"
knife[:azure_client_secret] = "#1234p$wdchef19"
Your file should now be populated with your Chef information and your Azure Service Principal information.
Install Chef Workstation
Chef Workstation helps you get started with Chef Infra and Chef InSpec, Chef Workstation helps you create cookbooks, run executions etc.
Download the latest version of Chef Workstation and install it on your system.
Once installed you will see on your desktop a shortcut called, "CW PowerShell". This is the Chef Workstation PowerShell environment. This will be where we work with Workstation. If you launch the CW PowerShell environment, you can run chef --version to check the that it's been installed correctly and confirm the version you have installed.
We now want to install the Knife extension so that we can use Chef Workstation to interact with the Azure Resource Manager and deploy resources for us.
To do that we need to run the following command within our CW PowerShell environment:
chef gem install knife-azure
The next commands to run ensure you configure your Git default account identity.
git config --global user.email "you@example.com"
git config --global user.name "Your Name"
You should reboot your machine so the software completes installation fully.
Now that we have everything set up we can start to create our cookbooks and deploy resources to Azure!
Deploy a Virtual Machine in Azure with Chef
Create a Cookbook
In Chef a Cookbook is a set of commands you wish to execute on your managed client. In this example we're going to generate a Cookbook that helps to set up a webserver with IIS installed on it.
Launch the CW PowerShell environment and make sure you are in the C:\Chef\cookbooks directory. Now run the following command:
chef generate cookbook webserver
This command generates a set of files under the directory C:\Chef\cookbooks\webserver. The file we are most concerned about at this stage is C:\chef\cookbooks\webserver\recipes\default.rb, this is the file that holds the set of commands that will be executed on the managed client.
We will be configuring the default.rb file to install IIS, start IIS and copy a template file to the wwwroot folder on the managed client.
Open up C:\chef\cookbooks\webserver\recipes\default.rb and add the following lines:
powershell_script 'Install IIS' do
     action :run
     code 'add-windowsfeature Web-Server'
end

service 'w3svc' do
     action [ :enable, :start ]
end

template 'c:\inetpub\wwwroot\Default.htm' do
     source 'Default.htm.erb'
     rights :read, 'Everyone'
end
Create your web server template
We need to create the template file that Chef will copy to your managed client as part of it's build. You can do this by running the command:
chef generate template webserver Default.htm
Within your C:\Chef\cookbooks\webserver\templates directory you should now have a Default.htm.erb file, if you edit this file and add some simple HTML code to it, this will be the default page for your webserver to display to users.
Something like this should be a starting point:
<html>
<header><title>This is title</title></header>
<body>
Hello world
</body>
</html>
Upload the Cookbook to the Chef Server
Now that we have a Cookbook written and ready to use we need to upload it to our Chef Server so that it is centrally available for our managed client to pull down and use.
To do that you need to run the following command:
knife cookbook upload webserver
The above command will use the information we put in our knife.rb file earlier to decide where our Chef Server is and upload the information accordingly. I'm using a Hosted Chef server so can navigate to https://manage.chef.io click on Policy and see my Cookbook on my server.
Deploy a virtual machine
Now we are ready to start deploying the virtual machine and then apply our Cookbook. To deploy the Azure resource we are going to use the knife azurerm server create command. You can find the official documentation around the knife azurerm module here.
In this example I am going to deploy a Windows Server 2016 server within the West US region and use the Standard_DS2_v2 size. Be aware that not all sizes and regions are available with all subscriptions, so you may need to modify the variables accordingly.
knife azurerm server create `
--azure-resource-group-name rg-chefdeployment `
--azure-storage-account store `
--azure-vm-name chefvm4 `
--azure-vm-size 'Standard_DS2_v2' `
--azure-service-location 'westus' `
--azure-image-reference-offer 'WindowsServer' `
--azure-image-reference-publisher 'MicrosoftWindowsServer' `
--azure-image-reference-sku '2016-Datacenter' `
--azure-image-reference-version 'latest' `
-x myuser -P myPassword123 `
--tcp-endpoints '80,443' `
--chef-daemon-interval 1 `
-r "recipe[webserver]"
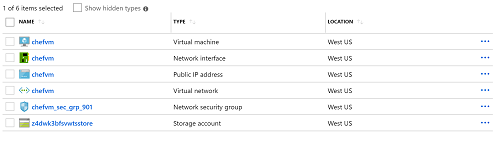
Once complete within your Azure Portal you will have the following resources:
Once the deployment is complete, the public IP address of the new virtual machine will be displayed on the completion of the deployment, you can take this and paste it into a web browser, the default template page that you designed should be available. When we deployed the virtual machine we opened port 80 so it should be available externally. If it doesn't appear instantly give it sometime as it can take some time for Chef to push down the relevant content to the new VM.
Call to Action
I hope this has given you a good starting point for using Chef with Azure, now get out there and give it a try!